Kamis, 12 Juni 2014

A change of heart

I like what I like and sometimes it’s very difficult for anyone to change my mind. I guess I’m what you’d call, stubborn.


I’m like that with food too. I am open to experiment with everything and anything but sometimes I just have a hunch I’m not going to like something, for example ice cream made with sweetened condensed milk. I thought it would be horrible, I was imagining cloying sweetness, nasty aftertaste and terrible texture. I was wrong. I made this type of ice cream only to realize it’s not as bad as I had imagined. It is actually pretty great.


I made this pastel pink-colored strawberry ice cream a few days ago when it has gotten unbearably hot here and we needed something to cool us off, quickly. I had all the ingredients at hand and it only took ten to fifteen minutes to make and a little over three hours to freeze. The same evening we enjoyed it and we felt refreshed from the heat.


The texture was amazing; rich, smooth and velvety, and the flavor not as sweet as I was expecting as it was balanced by the addition of freshly squeezed lemon juice. What bothered me in the resulting ice cream mixture was the intense milky flavor and aroma, so in order to compensate for that, I added some strawberry liqueur. Once frozen, the milkiness had mellowed, ending up being quite pleasant and not at all intrusive.


What I particularly like about this ice cream (like with this one) is the fact that it is creamy and rich even though it is not churned. No ice crystals are formed due to the fact that it contains only a small amount of water, thus making the ice cream smooth and velvety. Gotta love that.


Truth be told, I’m still partial to the classic ice cream base and method, and I don’t plan on putting away my ice cream maker, but hey, this one’s made me change my opinion about its kind.


No-churn strawberry ice cream
Adapted from Ijspret by Linda Lomelino

I didn’t remove the seeds from the strawberry purée as I enjoy them in the ice cream. If you don’t, pass the strawberry purée through a fine sieve to get rid of them.

As mentioned above, I added strawberry liqueur to the mixture to add an extra layer of strawberry flavor and to take away the milky flavor from the ice cream. You can use vanilla extract instead.


Yield: about 1 liter

Ingredients
250 g fresh strawberries
1 Tbsp lemon juice, freshly squeezed
1 tsp strawberry liqueur (or pure vanilla extract)
400 g sweetened condensed milk
250 g cream, full-fat (35%), cold

Special equipment: small food processor or blender, stand or hand-held mixer


Preparation
Rinse the strawberries under cold running water, hull them and cut them in half. Place them in a food processor or blender and purée them.


In a large bowl, add the strawberry purée, the lemon juice, the strawberry liqueur (or vanilla) and the sweetened condensed milk. Combine using a spatula until you have a homogeneous mixture.


In the bowl of your stand mixer (or in a large bowl), beat the cold cream on high speed with the whisk attachment (or using your hand-held mixer), until soft peaks form, i.e. until fluffy but still soft. Add one-third of the whipped cream to the strawberry purée-condensed milk mixture and fold it in using a whisk in order to lighten it up. Then add the rest of the whipped cream and fold it in with a spatula, very gently, so you don't deflate the whipped cream.


Empty the ice cream mixture in a container suitable for the freezer, cover it and place it in your freezer. After 3-4 hours depending on your freezer, your ice cream will be ready and you don't need to stir, whip or beat the mixture in-between.

Before you serve it, leave it out of the freezer for 10-15 minutes.

You can keep the ice cream in your freezer for a week.

More strawberry ice cream.


Minggu, 08 Juni 2014

Summer soup

Sometimes I feel like I’m cheating on this blog and on my readers with instagram. It’s like I’m leading a double life. The ease with which I share my everyday kitchen adventures there, is making it difficult to come here and write lengthy stories and detailed recipes.


I don’t like this to be honest. I want to share more here but then again the effortlessness of posting a single photograph on instagram, one that tells a story by itself, with just a caption below it or even without one, is particularly appealing to me.


Perhaps I need to change my perception of what my blog is or what I want it to be, the idea I have of it and the purpose it has for me. I want to be flexible and more spontaneous yet the fact that I write this blog in two languages makes it difficult to post as quickly as I’d want to. Perhaps I should also stop being such a perfectionist and not need to have all the photos of the process and the recipe written just so. I guess I need to work on these things in order to post more regularly here and share with you all the goodies I make. I want that so much! And believe me I have lots to share.


So in an effort to do that, I’m sharing with you a soup I made the other day. A watercress soup with green apple and super-quick pickled radishes. It is delicious, healthy and light, the best type of soup to enjoy during these first days of summer.


It can be eaten either warm or chilled and it is perfect either way. It’s not a thick soup but on the thinner side and scrumptiously light, with crunch and pungency coming from the pickled radishes. It’s a fresh, herby and vibrant soup with sweetness from the apple, potatoes and onions that tames the strong pepperiness of the watercress while the acidity and sourness of the yoghurt complements it.


Watercress soup

Use the freshest and best quality watercress as it will make all the difference. Don’t go for the packaged leaves but buy whole bunches of watercress with their stems. For those of you who haven't tasted watercress before, it is peppery and slightly bitter, reminiscent of rocket, and has the freshness of purslane.

I used my trusted mandoline to julienne the radishes, but a good sharp knife will do the trick as well.


Yield: 4-6 servings

Ingredients
3 Tbsp olive oil
2 onions, finely chopped
1 large garlic clove, finely sliced
200 g potatoes, peeled and cubed
2 Golden Delicious (green) apples, peeled and chopped
2 large bunches (about 400 g) fresh watercress with stems (tough stalks removed), chopped
1 liter chicken (or vegetable) stock
1 small bunch (about 20 g) fresh parsley, chopped
Salt
Freshly ground black pepper

for the super-quick pickled radishes
6 radishes, cut julienne (matchsticks)
½ tsp white balsamic (or white wine) vinegar
½ Tbsp water

120 g Greek strained yoghurt, full-fat, for serving

Special equipment: mandoline (optional), small sieve, immersion or regular blender


Preparation
Add olive oil in a large, heavy-bottomed pot and heat over medium heat. Add the onions and sauté for 3-4 minutes stirring constantly until translucent and then add the garlic. Sauté for 1 minute, stirring continuously and then add the potatoes and apples. Stir, cover the pot with the lid and cook over low heat for 8 minutes.


Add the stock and bring to the boil over high heat. Turn heat down to low and simmer for 15-20 minutes or until the potatoes and apples are very soft. Add the watercress and parsley and cook for 4-5 minutes with the lid open. Give the soup a taste and add salt and pepper.
Turn heat off and leave to cool for 5 minutes before liquidizing the soup.


In the meantime, in a small bowl, add the radish and the vinegar and mix with a spoon. Then add the water and mix again. Put aside for 5-6 minutes, then drain well using a small sieve.


Ιf you’re using an immersion blender, liquidize the soup directly in the pan until smooth. If you have a regular blender, transfer the soup little by little to it and liquidize until you have a smooth soup. Return soup to the pan.

Serve the warm soup into bowls, add a dollop of yoghurt and top with a few pickled radishes.

You can also serve it chilled.
Enjoy!


Minggu, 01 Juni 2014

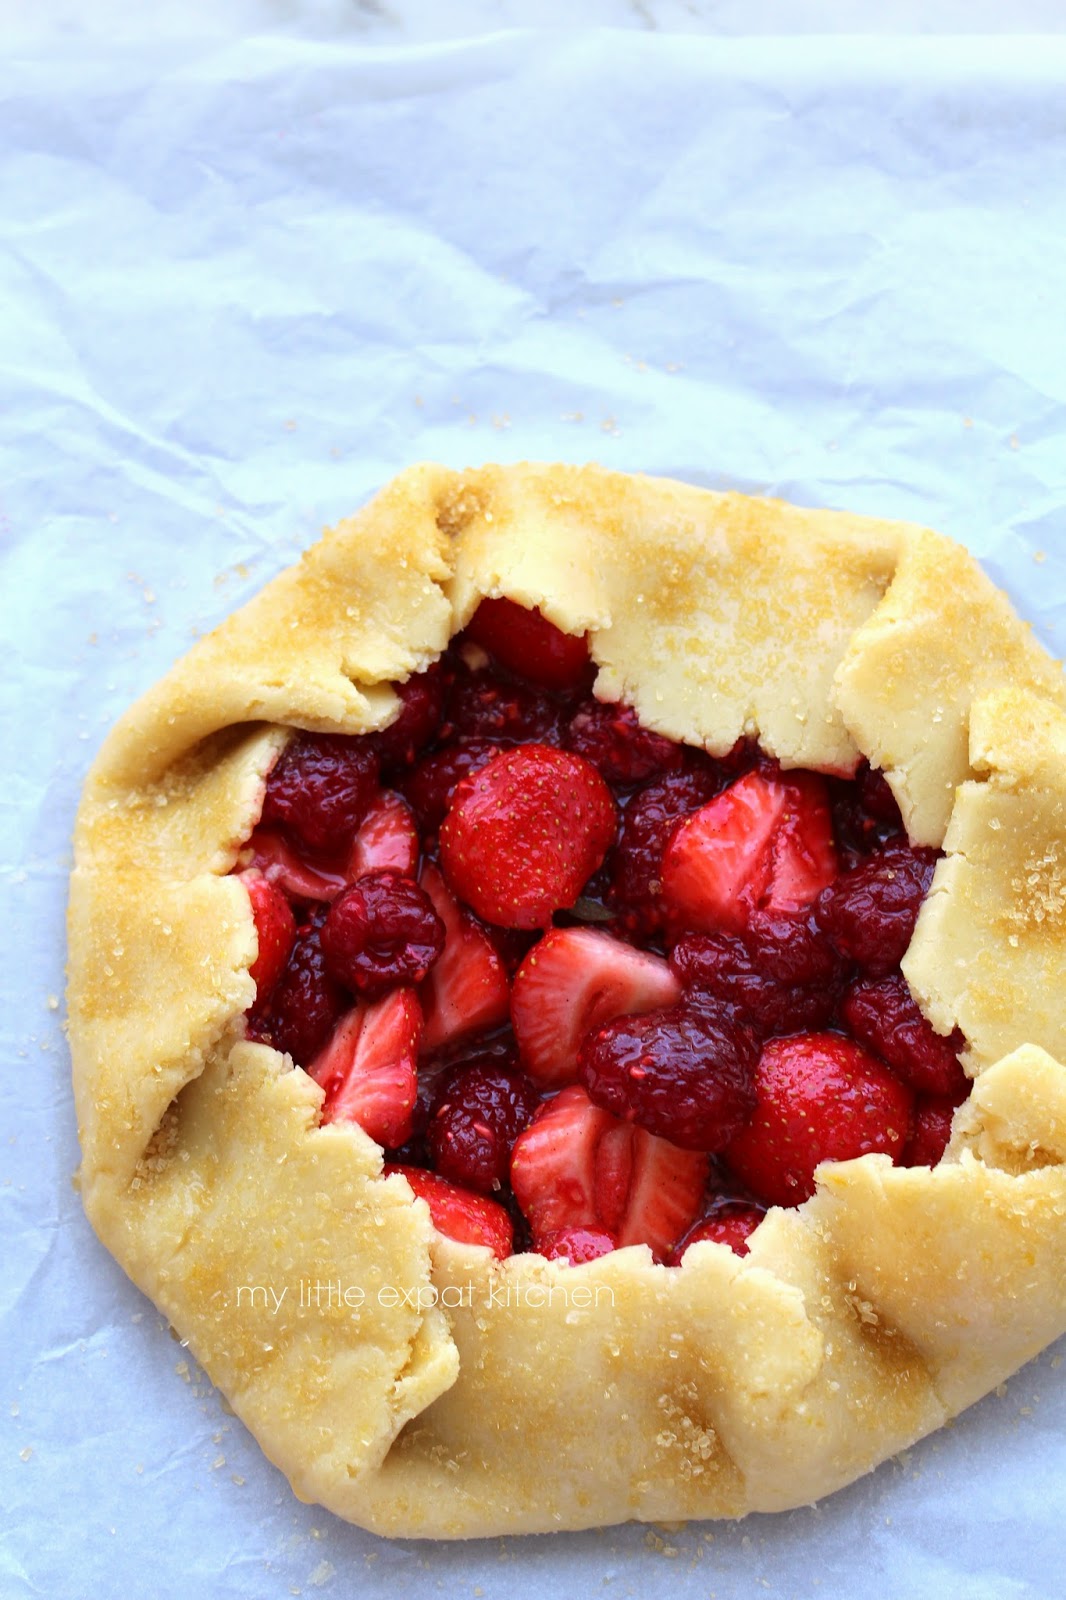
Strawberry and raspberry galette

I have been enjoying fresh strawberries for over a month now. It’s always the greatest feeling each year when I see the first ones appear at the market and I want to take home with me each and every little basket I lay my eyes on. I become a glutton, munching on them every chance I get, mostly with just a sprinkling of sugar.


After a while, I reluctantly begin to add them to desserts. Tarts, cakes, galettes and of course ice creams. When they mingle with butter, cream, sugar, flour and eggs, their taste becomes a little muted but never muddled.


Then I begin the process of jam making. That’s a huge deal to me when it comes to strawberries. I want to preserve the little red beauties for weeks and months to come, keep them for when the memory of the fresh berries has long fainted and I desperately need to it to be revived.


My go-to recipe is this one and this year I deviated from my regular way of making it. I lightly mashed the strawberries and allowed them to simmer for fifteen more minutes to get that traditional jam texture and feel. S was complaining, as he prefers the preserve-like type of jam with the whole fruits floating in the sweet liquid, but of course he proceeded to finish the first jar in a matter of days.


A couple of days ago I made this galette with strawberries and raspberries. It’s not very photogenic, but I couldn’t help but sharing it because it tastes so damn good. It’s easy, quick and the best treat ever.


It has a buttery, flaky crust, with a little crunch at the bottom from the addition of ground hazelnuts to the base to soak up some of the fruits’ juices, and the light sprinkling of demerara sugar over the rim of the pastry not only adds a caramel-y sweetness but texture as well. The sweet and tart berries release their juices during baking and become almost like jam, and the apricot glaze makes them shiny again and adds that little bit of extra sweetness that balances the sourness of the raspberries.


When some months ago I was craving the flavor of strawberries, I bought an Italian wild-strawberry liqueur which came pretty handy with this galette. I added some to the filling and it gave such a lovely depth of flavor as well as a slight kick. You don’t need to use it if you don’t have it already and I wouldn’t suggest you buy it for that purpose only, but it was a nice touch.

I’ll leave you with this song. Happy June, and see you soon!


Strawberry and raspberry galette

A galette is an easier type of tart in the sense that it’s free-form and you don’t need a tart-pan to bake it in. You just roll it out, place the filling in the center and bring the sides of the pastry up and over the fruit.
Make sure to bake the galette inside a rimmed baking sheet as it will inevitably leak; not a lot but just enough to be unpleasant for you and your oven. I learned this the hard way when, one time, the bottom of my oven was covered in caramelized juices from a similar galette that leaked.

Demerara is raw cane sugar.


Yield: 6-8 servings

Ingredients

for the pastry dough
200 g all-purpose flour
2 Tbsp caster sugar
Pinch of salt
Zest of 1 lemon
140 g unsalted butter, cold and cut into cubes
1-2 Tbsp cold water

for the filling
180 g fresh strawberries, hulled and halved if large
120 g fresh raspberries
1 tsp corn flour
3 Tbsp caster sugar (or more if your berries are too tart)
½ tsp vanilla bean paste (or 1 vanilla bean, cut in half and seeds scraped)
½ tsp wild-strawberry liqueur (optional)

25 g (2 Tbsp) ground hazelnut

for the apricot glaze
1 heaped Tbsp apricot jam
½ Tbsp water

1 small egg, lightly beaten, for glazing the dough
Demerara sugar, for glazing

Special equipment: large food processor, plastic wrap, rolling pin, rimmed baking sheet, baking paper, pastry brush, small sieve


Preparation

for the pastry dough
• with a food processor
In a large food processor, add the flour, sugar, salt and lemon zest and blend for 5 seconds. Add the cold cubed butter and process for a few seconds until the mixture resembles coarse breadcrumbs. Then add 1-2 Tbsp cold water and process in order to bring together the mixture into a dough that just holds together when pinched (see photo below). Add 1 Tbsp of water to start and see from there whether it needs more. You don’t want the dough to be wet.


• by hand
In a large bowl, add the flour, sugar, salt and lemon zest and stir with a spatula. Add the cubed cold butter and, using two knives, a pastry cutter or your fingertips, cut it into the flour, until you have a mixture that resembles coarse breadcrumbs. Then add 1-2 Tbsp cold water and mix with your hands, working quickly, until the dough comes together into a ball that just holds together when pinched (see photo above). Add 1 Tbsp of water to start and see from there whether it needs more. You don’t want the dough to be wet.

Empty the pastry dough onto a large piece of plastic wrap, form a disk, cover it and place it in the refrigerator to chill, for 40-45 minutes.

for the filling
Add the strawberries, raspberries, corn flour, sugar, vanilla and optionally the strawberry liqueur into a medium-sized bowl and mix gently with a spoon to coat the berries. Leave aside for 10 minutes.


Remove the pastry dough from the refrigerator, unwrap and discard the plastic wrap and place dough between two large sheets of baking paper. Using a rolling pin, roll out the pastry into an approximately 30cm round, with a 0.5cm thickness. Remove the top piece of baking paper and place the pastry, along with the bottom baking paper, onto a rimmed baking sheet.
Scatter in the middle of the pastry the ground hazelnuts. Arrange the strawberry-raspberry filling evenly in the middle of the round piece of pastry and on top of the ground hazelnuts, scraping out any juices and sugar that’s left in the bowl, and taking care to leave space around the edges of the pastry, about 5cm. Place the baking sheet in the fridge. At this point the pastry will have gotten soft so by putting it in the fridge, the butter will harden thus making the pastry flaky when baked.
Leave it in the fridge for about 25 minutes.


Preheat your oven to 180 degrees Celsius.

Remove it from the fridge and fold the edges of the pastry up and over the filling, making sure to seal any cracks, so the juices don’t run out during baking even though some will find their way out. You can use the baking paper to pull and fold the pastry dough over the fruit.
Using a pastry brush, glaze the dough with the beaten egg and sprinkle with some demerara sugar.
Place the baking sheet on the middle rack of the preheated oven and bake for about 40 minutes until the berries soften and the pastry takes on a golden-brown color.


Remove from the oven and immediately start to make the apricot glaze.
In a small pan add the apricot jam and the water and heat over medium heat until the jam melts, stirring constantly. Remove from the heat and strain the mixture. Using a pastry brush, glaze all the berries gently (not the pastry) being careful not to break them up.

Allow the galette to slightly cool. Serve warm with some crème fraîche or vanilla ice cream.
You can also eat it at room temperature.

You can keep it for a day or two, covered, at room temperature but it is best eaten the same day. The next day the pastry loses its flakiness and becomes somewhat biscuit-y but not hard.


Senin, 26 Mei 2014

Green & White

As I’m sitting in front of my computer writing these words, I can hear S upstairs playing his guitar. He's improvising, working on a track. In a little while, he will come downstairs and ask me to come up. He'll want my opinion on the music, ask me if it inspires me to write lyrics and sing to it. And then, perhaps, I will ask him to read what I've been writing here and tell me what he thinks.


I love these habits we have developed, the moments of communication on a creative level and beyond. These small realities of our everyday life are precious and revitalizing.


Another sort of habit we have involves Saturday and Sunday morning treats. Sometimes it’s croissants from the bakery with homemade jam and French press coffee, others it’s something from The Hague open market, in the form mainly of bread rings covered in sesame seeds that they sell at the Turkish stalls and that resemble the Greek ones.


Most of the times, it includes eggs. A brunch of sorts, just for the two of us. During the winter it’s fried eggs with feta. Now, at springtime, it’s poached or boiled eggs with asparagus or avocado, sometimes simply with a sprinkling of sumac and other times a little more complex and adorned, with a lemony, homemade mayonnaise sauce.


This creamy sauce is essentially a thin mayonnaise made with extra virgin olive oil, lemon juice and egg yolks. It is delicious. It’s sharp, rich and full-bodied and complements perfectly the nutty green and white asparagus, the soft-boiled egg and the slices of ham served over a nicely toasted slice of rye bread.


It’s a good brunch dish to have with friends on a Sunday or even for lunch on a less busy day spent at home.


Green and white asparagus on toasted rye bread with ham, soft-boiled eggs and a creamy, lemony, homemade mayonnaise sauce

This time I blanched/boiled my asparagus, but they’re also quite tasty grilled.

Cook your eggs to your liking. I usually prefer mine runny in the middle (6-minute egg, which I need to share how it’s done with you at some point), but this time I opted for a little firmer (8-minutes).

This homemade mayonnaise contains raw egg yolks so be careful not to serve it to people with compromised immune systems, infants, the elderly, or pregnant ladies. Make sure to use eggs of trustworthy origin and as fresh as possible.


Yield: 6 servings / 1½ cup creamy mayonnaise sauce

Ingredients

for the creamy mayonnaise sauce
4 medium egg yolks
Juice of 1 lemon (70-80 ml)
Salt
Freshly ground black pepper
150 ml extra virgin olive oil

350 g fresh green asparagus
500 g fresh white asparagus
Extra virgin olive oil
6 thin slices ham
6 large eggs, boiled to your liking
6 rye bread slices, toasted
Salt
Freshly ground black pepper

Special equipment: small food processor (or blender), vegetable peeler


Preparation

for the creamy mayonnaise sauce
In the bowl of a food processor (or in a blender), add the egg yolks, lemon and a little salt and pepper, and pulse 2-3 times to blend. With the motor running, drizzle in the oil at a very slow pace through the top of the lid, until incorporated. In the end you will have a thin mayonnaise sauce that resembles a thick dressing rather than the classic stiff mayonnaise, the recipe of which you can find here. Taste and add more salt or pepper if you think it needs it.
Keep the mayonnaise sauce refrigerated and covered until ready to use. Use it the same day you prepare it.


Peel and trim the woody stems of the green asparagus (read in this post how to trim them).
Peel the white asparagus and trim 1 cm off the bottom part of each spear.

Bring a large pot of salted water to the boil over high heat, add the white asparagus and boil them for 6-8 minutes (depending on their thickness) or until tender, without putting the lid on the pan. Test them by inserting the tip of a knife into one of the spears.
Remove them with a slotted spoon, draining them well, and place them in large plate.


In the same water, add the green asparagus and blanch them for 2-4 minutes (depending on their thickness) or until they are tender, without putting the lid on the pan. You can test them by inserting the tip of a knife into one of the spears. Be careful not to boil them for too long, they need to be a little crunchy.
Remove them with a slotted spoon and place them in the large plate with the white asparagus.
Toss them with a little olive oil.

Note: Blanching means to plunge raw vegetables or fruit into boiling water, and boil them for a few seconds to a few minutes (depending on the fruit/vegetable), until they slightly soften but still retain their crisp texture and vivid color.


To serve, place the toasted bread slices on plates. Fold on top a slice of ham. Lay 3-4 whole asparagus on top and drizzle some of the mayonnaise sauce over the top. Cut in half the eggs, place them on top and season with salt and pepper. If the eggs are runny, it’s best if you let each person cut open their own egg to watch the yolk ooze out.
Put the mayonnaise sauce in a bowl at the table and let everyone help themselves to more.

Enjoy!