Sabtu, 19 Februari 2011

Gone

I wasn't sure that I wanted to write this post. I wasn't sure at all.

I wasn't sure that I wanted to share this with you.

I didn't know if I should write this or how it would make me feel afterwards.


Then I thought that this blog is a part of me, and apart from the recipes that I share with you, it reflects my personality, my interests, my idiosyncrasies, my joys and sometimes my sorrows.
I share all that with you.


Still, this is very hard for me to write...


My dad died suddenly two weeks ago of a heart attack. He was still young and had so much to offer.


The trip to Greece was the worst of my life.


It's a difficult time for me. This experience is numbing and painful but with the support and love of my family, my friends and of course S, I'm going to be alright. I'm grateful to have them in my life.


My dad and me. Summer 1985


Kamis, 03 Februari 2011

My kind of sweet

If you have been reading my blog for a while, you are undoubtedly familiar with my proclivity for sweets. I haven't tried to hide it, not for a minute.


Quite the contrary, I have been trying to drag you down this road with me. A road paved with chocolate truffles and mango tiramisu, chocolate dulce de leche bars and triple chocolate cakes, Greek saragli and ravani. I know. I'm shameless. I am without shame.


And because I'm like that and I'm not going to change in the foreseeable future, I have something else for you, for me, for everyone. Another Greek sweet. A Greek sweet that will however make you feel a little less guilty for eating it, since it doesn't include a speck of butter or cream. No, those wicked ingredients will be included in my Valentine's Day sweets.


This Greek dessert is a traditional semolina halva with cinnamon and blanched almonds and trust me, it may be lacking in fat but it is certainly not lacking in flavor. It is a recipe that is categorized under Politiki cuisine, of which I have written about in a previous post. Politiki cuisine is a specific type of cooking of the Greeks who came from Poli (Constantinople) and it is the type of cooking I grew up with—it is my family's way of cooking.


This semolina halva is the one I have been eating ever since I was a little girl. It is the one I yearn to savor every time I go to my grandma's house and the one I have learned to prepare by watching her cook it a million times for my brother and me.


Semolina halva has only a handful of ingredients that yield one of the best desserts. Some of you may have not eaten it before so let me explain how this works. The semolina is first browned in some vegetable oil, while a simple syrup of water and sugar is prepared. The syrup is poured over the hot semolina, making it bubble up and sizzle, and after a few minutes, and through stirring, it calms down, now having the consistency of thick polenta. It is left covered for a while to absorb all the liquid and it is then fluffed up with a fork, like one would do with couscous, and sprinkled with ground cinnamon and blanched almonds.


There are versions of semolina halva that have a very gelatinous texture due to the addition of large amounts of syrup and milk, which I don't like at all. My family's recipe is somewhat different, not to mention better, in both texture and flavor.


The halva has a slight bite to it, being a little granular rather than sticky and has a deep, nutty flavor from the semolina. It is sweet but not overly so, it has a spicy, gentle finish of cinnamony awesomeness and the blanched almonds render a crunchy texture and a beautifully milky taste to the dessert.


Have it after dinner with a cup of coffee or tea or, if you are like me, enjoy it spoonful after spoonful, while you're sitting in front of your computer, reading your favorite blogs.


Politikos Halvas (Greek Semolina Halva with Cinnamon and Blanched Almonds"

Make sure you use good quality semolina because it makes all the difference in this dessert.

I usually buy blanched, halved almonds from the super market but there are times when I can only find raw ones, with skins on, which I need to blanch myself. It is extremely easy to do, believe me, and here's how you do it.
Put them in a bowl and pour boiling water over them. Let them stand for 1 minute (not more as they'll lose their crunchiness), drain them, rinse them under cold running water so that they're cool enough to handle, and drain them again. Place them on a clean kitchen towel and squeeze the skin off with your fingers. Pat them dry and they're ready to use.
If you want, you can cut them in half lengthwise but you can use them whole too.


Yield: 6-8 dessert servings

Ingredients
590 ml water
275 g sugar
70 ml corn or sunflower oil
250 g fine semolina
2-3 Tbsp ground cinnamon (or more depending on your taste)
35 g blanched, halved almonds (read above on how to blanch them)


Preparation
In a small saucepan with a lid, add the water and sugar. Set aside.

In a medium-sized, heavy-bottomed pan with a lid, heat the oil over medium heat until it starts to shimmer.
Add the semolina and stir continuously with a wooden spoon until it has taken on a golden-brown color. This will take about 10 minutes and this is the tricky part of the recipe. You need to stir the semolina the whole time otherwise you run the risk of burning it. You also might need to moderate the heat. If you notice that the semolina is starting to burn rather than brown evenly, then you might want to turn down the heat a little.

While you're browning the semolina, place the small saucepan with the water and sugar over high heat in order to prepare the syrup. Stir with a spoon until the sugar is dissolved and let the syrup come to the boil. Remove from heat and put a lid on the saucepan.
Note: You need to pour the syrup over the browned semolina while they are both hot. So prepare the syrup as late as possible.

Once the semolina has taken on a golden-brown color, take the pan off the heat and pour the hot syrup slowly over the semolina. Be careful, it will splatter as it bubbles up and sizzles. Stir continuously with a wooden spoon while you're pouring the syrup. It would be wise if you'd wear an oven mitt on your hand while doing that, so that you don't get burned by the bubbling up of the semolina. The mixture will have a liquid texture at this point.
When it stops bubbling and sizzling, put the pan back on the heat (low heat) and cook for 2-3 minutes, stirring continuously. As you stir the semolina, it will thicken and create large lumps.
Take the pan off the heat, place a clean kitchen towel on top of the pan and put on the lid. After 5 minutes, take the lid and kitchen towel off and allow the halva to cool slightly in the pan.

Using a spoon, break up the halva into smaller pieces and fluff it up a bit, using a fork. Add the ground cinnamon and mix it through. Alternatively, you can sprinkle some cinnamon on top of the halva when you serve it.
Add the blanched almonds on top of each plateful.

The halva is best eaten warm but it can also be eaten at room temperature. I actually prefer it at room temperature myself.

You can keep the halva in an airtight container, at room temperature, for up to 4 days.


Rabu, 26 Januari 2011

The culprit

This is the culprit. This is the fresh chili pepper I bought the other day, being completely unaware of its potency.


I had the audacity to sample it raw, cut into a piece no larger than a lentil, and it took revenge on me by making my mouth flame.

This hot yellow chili pepper made my lips swell and hurt and sting and become redder than lips that have been passionately kissed for hours.

This is the chili pepper that gave me no pleasure at all.

This chili is the scotch bonnet. We hadn't been properly introduced before yesterday and it will be a while before I invite it back in my kitchen.


Lesson learned.


P.S. That doesn't mean I don't love chilies anymore. Just so you know.


Sabtu, 22 Januari 2011

The unbearable lightness of the soufflé

Whenever I hear the word soufflé, I'm imagining fat French chefs with white, tall, pleated hats running around in a busy restaurant kitchen, shouting to each other while trying to cautiously carry a soufflé dish that has just been taken out of the oven.


Or other times, I'm imagining an elegant French woman in a Parisian apartment kitchen, waiting patiently right next to her oven for the soufflé to rise while reading French Vogue, with a cigarette dangling from her red colored lips.


Well, that's just me; I like to visualize and make up stories about the people who might cook and eat certain types of food or dishes. Admittedly, some of those images are stereotypical but hey, when I think of souvlaki, I can't imagine anything other than a handsome Greek, virile man standing outside a souvlaki joint, getting all greasy while devouring a couple of them.


Or, when a dish of paella comes to mind, I can't help but visualize a raven-haired Spanish woman with a colorful apron wrapped around her waist, standing over a huge, steaming paella pan, adding to it yet another type of fresh seafood.


I enjoy these images but having said that, they are the ones I want to break down. I don't have to be Italian to make a mean spaghetti Bolognese or Brazilian to make a good feijoada. I don't like to be intimidated by food or dishes. That's not what cooking is about and I'm a firm believer that anyone can cook anything.
And on that notion, my soufflé baking adventure began.


The first time I've ever made a soufflé was about a year and a half ago when I took some classes in Amsterdam on French regional cooking. It was during one of those classes that I was confronted with the task of making a soufflé. A hot vanilla soufflé with lavender and candied violets or as the chef called it "Soufflé chaud vanille et lavande avec violettes confittes". It all sounded very French, very difficult and very complicated but it actually wasn't. With the help of my fellow aspiring soufflé makers and the chef in charge of the class, we accomplished a pretty good dish but I couldn't take the credit for it. I haven't done it all by myself.


So I had to attempt making a soufflé on my own, from start to finish, and the one I've always wanted to try was the classic savory soufflé—the cheese soufflé. I don't know why I've waited this long to attempt it but a few days ago, I thought it was time. I gathered my ingredients, my equipment and my courage and started making the roux, boiling the milk, beating the egg yolks and cheese into my sauce and then whipping the egg whites into a fluffy meringue and incorporating it into the cheesy mixture.


I put my creation in the oven and after thirty minutes I had a soufflé, or did I? My first attempt was somewhat of a failure since it didn't live up to its name, it didn't puff up, but the taste was excellent. Disappointed as I was, I wasn't going to give up that easily. The next day I was going to try again. I did some research on the internet and my cookbooks, figured out what I did wrong the previous day and tried it once more.


This time it was perfect. It puffed up beautifully—even though it took me some time to photograph it so what you see in the photos is a slightly collapsed version of it—and the taste was glorious. Light, fluffy, cheesy, soft, everything a soufflé should be. My very own cheese soufflé!
And then, after I spooned some of it onto a plate, it showed its truly ephemeral nature. Ah, the soufflé...


Three-Cheese Soufflé
Slightly adapted from Mastering the Art of French Cooking

The secret of a good soufflé is in the whipping of the egg whites. They need to be just right in order to make the soufflé rise. What actually makes the soufflé rise are all the tiny air bubbles that are trapped inside the beaten egg white foam. Those air bubbles expand as the soufflé bakes in the oven, causing it to increase in volume. When you take it out of the oven, the change in temperature causes these bubbles to contract thus making the soufflé collapse. Simple physics.


Some Helpful Tips
—Egg whites that are at room temperature can incorporate more air thus producing a fluffier and more puffed up soufflé. But, it is easier to separate eggs that are cold. So, before you start making the soufflé, take the eggs out of the fridge, separate them, and let them come to room temperature before handling them.
—The bowl you use to beat the egg whites in must be very clean and dry.
—You must not drop any egg yolk (fat) in with the egg whites because it will prevent them from firming.
—You must beat the egg whites until they form stiff peaks and are shiny.
—Do not overbeat the egg whites because they will become grainy.
—The sauce (base) you make for the soufflé must not be stodgy and pasty but creamy otherwise, once you incorporate the egg whites, the whole mixture will become too dense, thick and heavy and the soufflé will not rise properly.
—You must incorporate first 1/3 of the egg whites into the sauce in order to lighten the mixture up and then fold in the rest carefully, quickly and just until there are no large, unblended patches of egg whites. Do not overfold, otherwise you are going to deflate the egg whites and your soufflé will not puff up.
—Butter generously the sides of the dish before you add the soufflé mixture and use upward strokes when you apply the butter with the pastry brush.
—Once your soufflé is in the oven, do not open the oven door. Any fluctuation in temperature will cause your soufflé to deflate. You haven't done all this work for nothing, right?
—You need a specific type of mold/dish to bake your soufflé in. This must be a porcelain or pyrex round mold that is high sided. If you use a wide and shallow dish, your soufflé will not cook properly and will not rise.


This soufflé, served with a green salad, makes a wonderful main-course dish but you can also serve it as a side or first dish.


Yield: 4 main-course or 6 first/side-dish servings

Ingredients
55 g unsalted butter plus 10 g (softened) for buttering the dish
35 g all-purpose flour
240 ml milk, full-fat
½ tsp salt
1/8 tsp freshly ground black pepper
A pinch of cayenne pepper
A pinch of nutmeg
4 large egg yolks
5 large egg whites
90 g Gruyère cheese, coarsely grated
20 g mature Cheddar cheese, coarsely grated
10 g Parmesan cheese, finely grated

Special equipment: 6-cup soufflé dish (18 cm in diameter, 8.5 cm height), hand-held mixer


Preparation
Butter generously (with the 10 g of butter) the bottom and sides of the soufflé dish using upward strokes. Sprinkle half of the Parmesan cheese inside the dish to lightly cover it and then tap out the excess. Gather the excess cheese and put it with the rest of the Parmesan.

Preheat your oven to 200 degrees Celsius and position the rack in the middle of the oven.


In a small saucepan, add the milk and bring it to the boil.
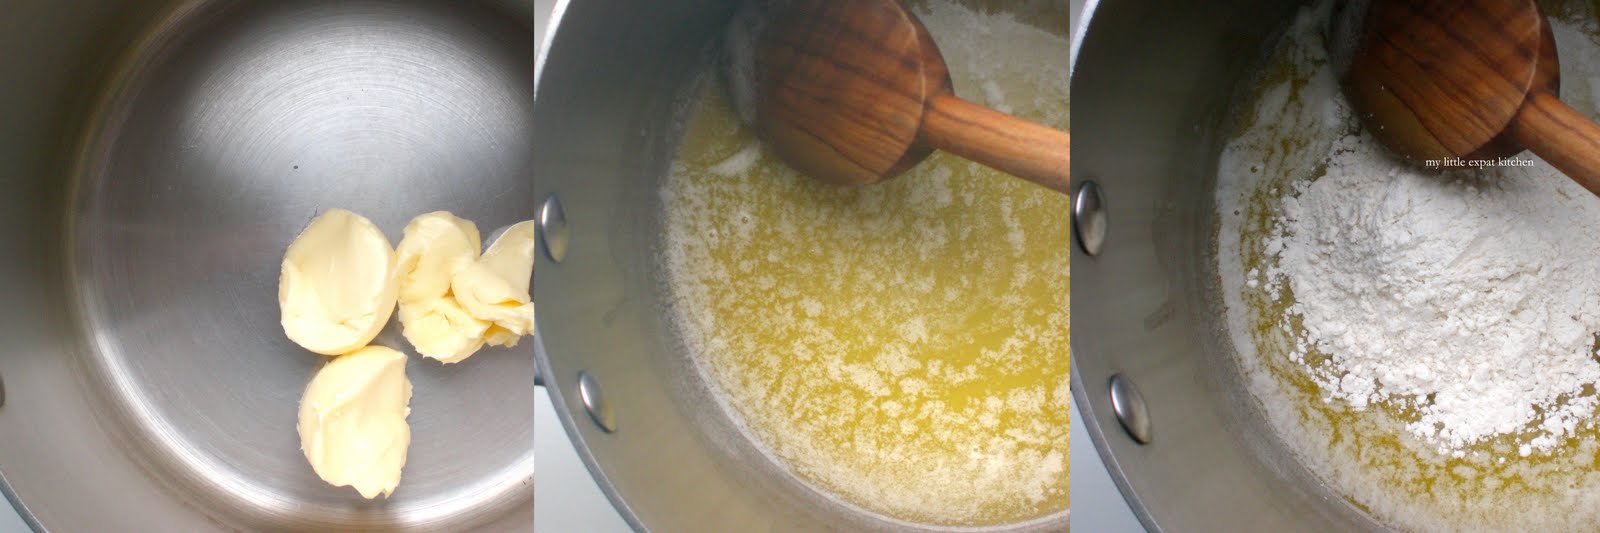
In a medium saucepan, add the butter (the 55 g) and melt over medium heat. When it starts to foam, add the flour and stir continuously with a wooden spoon. This mixture is called a "roux". When the roux starts to foam, after about 1 ½ minutes, remove the saucepan from the heat. Be careful not to burn the roux. It should not brown at all.
Let it stand for 1 minute, then add the boiling milk and, using a wire whisk, beat vigorously until blended. There shouldn't be any lumps. Add the salt, the black and cayenne pepper and the nutmeg and beat again.
Return the saucepan to the heat (medium-high heat) and continue to whisk the sauce until it comes to the boil. You will now have a very thick sauce.
Remove from the heat and start adding one egg yolk at a time, whisking continuously after each addition. After you have beaten in all four egg yolks, put saucepan aside. This is now the base of your soufflé.

In a large stainless steel bowl, add all the egg whites with a pinch of salt and start beating them with the hand-held mixer. Start by beating at low speed until the egg whites start to foam and then continue to beat at high speed until you have stiff peaks and the egg whites are shiny.


Empty the sauce (which must be lukewarm by now) in a large bowl and add 1/3 of the whipped egg whites to lighten the soufflé base. Using a wire whisk, blend the egg whites into the sauce. Add the Gruyère and Cheddar cheese to the mixture and whisk gently. Empty the rest of the egg whites into the mixture and, using a rubber spatula, fold them in carefully but quickly so that they don't lose the incorporated air. It's ok if there are small patches of unblended egg whites in there. The point is not to overmix thus deflating the egg whites.

Transfer the batter to the prepared soufflé dish and sprinkle with the remaining Parmesan cheese. Place the dish in the middle rack of the oven and turn the temperature of the oven immediately down to 190 degrees Celsius. Let the soufflé bake for 25-30 minutes until it puffs up and becomes golden brown on top. Do not open the oven door before that.

Once ready, take it out of the oven and serve immediately because it will soon collapse.


Selasa, 11 Januari 2011

Say cheese

My mom is responsible for my love of cheese. When I was little, we would go shopping together at the local deli where our first stop would always be in front of the cheese counter. The heady smell of cheese made me dizzy and I'd tug her dress so we could move on to the more interesting counters where chocolate and cakes were displayed.


But no, she wouldn't give in. She'd sample every cheese that struck her fancy, from the Cretan kefalograviera to the Italian provolone and from the Greek mizithra to the French roquefort, making remarks about their acidity and creaminess to the owner of the deli.


As her culinary travel ended, she'd get three-four different kinds of cheese and we'd move over to the cold cuts counter and then on to the sweets. That's where I would go crazy; I'd glue my little face and hands to the glass, marveling at the view of candy and I'd ask her to buy me every single chocolate I laid my eyes on. Again, she wouldn't give in. She'd buy me a milk chocolate bar, my favorite kind, and that was it.


We would then stop by our greengrocer's for fresh fruit and vegetables and by the neighborhood bakery to get a couple of big loaves of crusty bread that I had the task of carrying all the way to our house. The bag always seemed so heavy to me but I was rewarded by the smell of fresh bread creeping out of the bag, enveloping my nostrils.


When we'd get home, a treat was in store for me. My mom would hastily put most of the stuff we had bought away in the cupboards and fridge and would ask me to go sit at the kitchen table. She'd bring the butter along with one or two different types of cheese and she'd break open the still warm bread loaf with her hands. She'd slather some butter on a piece of bread and then... then it was time for the cheese.


Sometimes she'd choose a hard cheese, which would be neatly placed on top of the buttered chunks of bread and other times she'd fancy a soft cheese, like Roquefort, and she'd spread it thickly on top of the bread, creating a perfect amalgam of creamy cheese and rich butter. She would then urge me to have a taste; a taste which I don't remember ever resisting.


The taste of Roquefort; I loved its saltiness and the tanginess I felt at the top of my mouth after a single bite. I loved its green and blue-colored wrinkled holes appearing inside the creamy off white of the rest of the cheese. I loved the smell that would hit me the moment I'd bring the Roquefort-smeared piece of bread near my mouth and the longing for a cold glass of milk afterward. I loved Roquefort almost as much as my mom loved it and you know what? I still do; as does she.


I sneak it anywhere I can, anywhere I can afford it won't be traced by S who, is not a great fan of blue cheese. I sneak it into tarts (like this one), pies, pizzas, grilled stuffed chicken breasts and steak sauces, and even though I can't say I'm artful enough to sneak it into a salad, still, I take my chances. And guess what? In this particular salad, it actually worked. S, despite noticing its obvious presence, loved it.


It's not a complicated salad but rather a simple, straightforward one, as all good salads should be. Slightly bitter Belgian and red endive, crisp apple, earthy walnuts, the almighty Roquefort and a vinaigrette that's made in heaven with raspberry vinegar, olive oil, Dijon mustard and honey.


Paired just with fresh, crusty bread, you have lunch. Paired with a big juicy steak, you have dinner. Serve it as part of a large festive meal or a casual dinner with friends along with a bottle of Cabernet-Sauvignon. Take it to the office with you for a light lunch. The possibilities for a salad of this kind are endless and you can definitely change it up by using pears instead of apples or hazelnuts instead of walnuts.


Speaking of changing things up, I got an uncontrollable urge the other day to change the banner of my blog. I played around with some ideas and some photographs I had taken and I came up with this. I really like it. It brightens up the place, don't you think?


Endive Salad with Apples, Walnuts and Roquefort Cheese with Raspberry Vinaigrette

I used Gala apples, which I love, because of their sweet and mild taste but also because they are crisp and firm and have a thin skin. You can certainly use any other type of apple you enjoy eating in salads, as long as it's slightly sweet rather than tart.

Choose Belgian endives with yellow colored tips rather than green because they taste less bitter.

In case you can't find raspberry vinegar, you can use red wine vinegar to make the vinaigrette. It won't be called raspberry vinaigrette anymore but it will taste fantastic.


Yield: 6 salad course servings or 4 main course servings

Ingredients

for salad
2 heads Belgian endive, around 170 g each
2 heads red endive, around 120 g each
2 Gala apples, around 160 g each
60 g walnuts, roughly chopped
100 g Roquefort cheese

for raspberry vinaigrette
35 ml raspberry vinegar
130 ml extra virgin olive oil
1 heaped tsp honey
2 tsp Dijon mustard
Salt, to taste
Freshly ground black pepper, to taste


Preparation

for salad
Cut the stems off of the Belgian and red endives, separate the leaves and rinse them under running water. Cut each leaf in half lengthwise.

Rinse and cut each apple into 16 wedges without removing the skin.


for raspberry vinaigrette
In a medium-sized bowl, add the vinegar, olive oil, honey and mustard and whisk well until the ingredients emulsify.
Add salt and pepper to taste.

assemble the salad
Arrange the endive leaves on a big platter and top with the apple wedges. Sprinkle with the chopped walnuts and crumble the Roquefort cheese on top. Using a spoon, dress the salad with the vinaigrette.
Serve immediately. Place the rest of the vinaigrette in a small bowl in case anyone wants to add more on their salad.

You can make the vinaigrette one day ahead and store it in the fridge, covered with cling film.


Kamis, 30 Desember 2010

...and a Lucky New Year

In Greece, during the Christmas holidays and all the way up to New Year's, the gambler in everyone comes out. 'Tis the time of poker and black jack playin' and roulette dice rollin'. Well, I suppose during the holidays, Greeks become totally addicted to games of luck.


The members of my family are the definition of the holiday gambler and no, we don't actually go out to any casinos but we kind of bring the casino to our house. Every year, around New Year's, my family's traditions switch from holiday baking and ham glazing to setting the table for a little card game fun.


The green felt tablecloth makes its appearance from the buffet drawer. It is perfectly ironed, no crease to be seen anywhere, no crease that will accidentally make a poker card flip and reveal what a perfect little bluffer my cousin is. The poker chips are all aligned in their boxes, ready to be distributed by my brother among us high rollers (!) and the good quality plastic playing cards are cleaned and ready to be dealt by my uncle, who always gets a kick out of being the card dealer.


Our lucky game of choice is poker. Draw and stud poker, lowball, follow the Queen, roll your own, to name but a few variants of the game. We all gather around the table, we put our game or better yet, our poker faces on and... let the games begin!


I have to say that, we take the game pretty seriously. No funny business is allowed and even if the youngest, more inexperienced members of our extended family play or friends who are newly initiated to our holiday customs join us, they are all expected to follow the same rules. They don't get any special treatment—we call that "tough poker love". How else are they gonna learn?


We bluff, we pass, we bet, we win, we lose, we laugh, we yell, we eat, we drink. Well, food and drinks are always part of whatever activity my family's engaged in and since the games might go on for hours, we surely need something to nibble on and sip. Nibbling is confined to finger food, spiced nuts and chocolate truffles that are passed around if we're in the mood for something sweet, and let me tell you, we always are.


When poker is played, or any card game for that matter, messy food may not be allowed but the drinks, ah the drinks; there are no rules where drinks are concerned. The bar is open and everyone can have whatever they want. Each member of the family has their favorite drink but I always like to be flexible or change things up. Sometimes I go classic, with a brandy or a Scotch, other times I'm in the mood for something sweet, like Port or Sherry, and then there are the times when a cocktail is in order. And it goes something like this; coffee liqueur, vodka, espresso, sugar, milk, ice / mix, pour, drink.


Listen, I'm not crazy about coffee and I'm perhaps one of the few people out there who could live without it but what I'm absolutely nuts about, are coffee-flavored desserts and drinks; coffee flavored alcoholic drinks that is. Espresso cocktails and Cappuccino shots are my favorites of the kind and I urge you to try them on New Year's Eve, right before you give a kiss to your loved one to usher in the New Year.
And then I urge you to try them on New Year's Day, right when you finish your big festive meal and you're waiting for that chocolate dessert to come.


And then I urge you to try them on every other weekend after that, until summer comes and you begin to crave fruity type of drinks. Until then, these are the mixed drinks of my winter and the reasons why you must try them are fairly straightforward. Both of these drinks are delicious, easy to prepare, they don't require fancy or outrageous ingredients and most importantly, they are guaranteed to make you light headed and alert at the same time. Is there anything more you could possibly want from a drink?


P.S. Yours truly rarely wins at poker but we have a saying in Greece "He/She who loses at card games, wins in love".


Espresso Cocktail
Adapted from Robert Schinkel

Have your New Year's kick with this amazing espresso-flavored cocktail. Don't worry if you don't have an espresso maker though. You can use the common instant espresso. Dissolve it in water and you're ready to go.


Yield: 200 ml espresso cocktail / 2 large drinks

Ingredients
80 ml freshly brewed espresso coffee
2 tsp sugar
20 ml coffee liqueur (such as Kahlua)
80 ml vodka
Pinch of ground cinnamon
10 large ice cubes
4 espresso beans, for garnishing (optional)

Special equipment: espresso maker, cocktail shaker, cocktail glasses


Preparation
Make the espresso coffee either by using an espresso maker or by dissolving instant espresso powder in hot water. Add the sugar and stir to dissolve. Leave the coffee to cool.

In a cocktail shaker (or any other shaker if you don't have a cocktail shaker) add the ice cubes, vodka, coffee liqueur, cinnamon and the cooled espresso. Shake vigorously for 20 seconds and empty the drink in the two cocktail glasses, passing it first through a sieve to get rid of the ice cubes (if you use a cocktail shaker you will not need a sieve because it's already attached to the tip of the shaker).

Garnish the cocktails with the espresso beans and serve immediately.

If you like your cocktail really cold, then add ice cubes to the cocktail glasses before you start preparing the drink. This will make the glasses super cold. Empty the glasses from the ice cubes before pouring in the drink.


Cappuccino Shots

I have been making these shots for many years. I have always enjoyed their "mock" cappuccino flavor but with alcohol, that gives a sweet buzz. Beware though; drink it slowly, otherwise you're going to get really dizzy, really quick.


Yield: 60 ml / 2 shots

Ingredients
20 ml vodka
30 ml coffee liqueur (such as Kahlua)
20 ml evaporated milk, beaten until frothy
Ground cinnamon, for sprinkling

Special equipment: milk frother, shot glasses


Preparation
In a large glass (or in a cocktail shaker), add the vodka and the coffee liqueur. Mix with a spoon and divide among two shot glasses.

Froth the milk with the milk frother and add three to four teaspoons of frothed milk on top of each drink.
Sprinkle with a little ground cinnamon and serve immediately.


I WISH YOU ALL A HAPPY AND LUCKY NEW YEAR!!