My family’s relationship with Italy is a close and strong one. I have two uncles that both went there to study and apart from getting a University degree, they also ended up meeting the love of their lives, two wonderful Italian women who became their wives and mother of their children.

I have cousins and second cousins living in Florence and Sicily and even though they don’t speak Greek, which is a shame, I speak Italian so thankfully communication has never been a problem between us.

The first time I went to Italy, it was for one of my cousins’ wedding. I was about thirteen, she was twenty-four and the happiest bride I have ever seen. As she is Catholic and I’m Orthodox, her wedding ceremony was very intriguing and completely different than anything I have ever experienced before. Everything was extraordinary; the church, the priest, the rituals. The only thing that was familiar to me was the abundance of food at the wedding reception. In that respect, I felt like I was home.
And the deliciousness didn’t stop there. The days leading to the wedding as well as those after, were filled with feasts as well. My aunt’s side of the family, the Italians, were feeding us pasta, pizze, meat stews, sfogliatelle and crostate, and my uncle’s side of the family, the Greeks, were making mousaka, giouvetsi, roast lamb and galaktoboureko.


I will never forget that first time in Italy nor my cousin’s wedding and I most certainly will never forget the food. My aunt always had some sweet nibbles around the house and apart from the confetti, which are candy-covered almonds traditionally given at Italian (and Greek) weddings, there were all sorts of cookies. Baci di dama is the one kind of cookie I remember vividly.

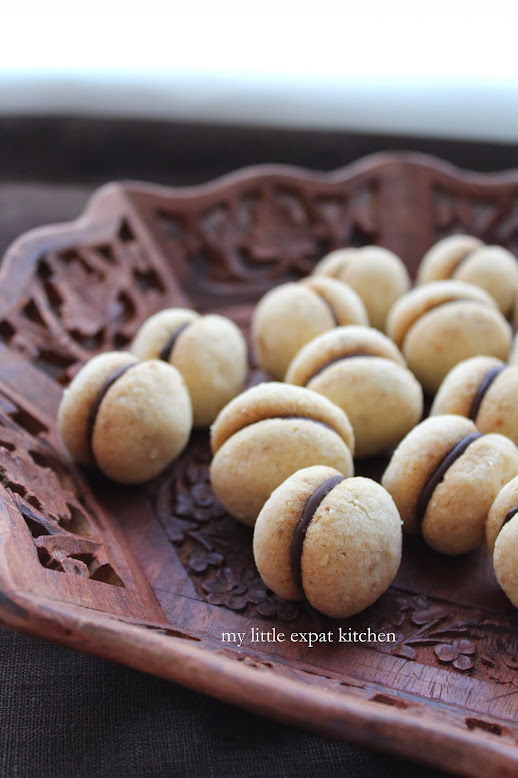
Baci di dama, meaning lady’s kisses, consist of two small hazelnut cookies sandwiched together with a dollop of dark chocolate. They are given that name because they resemble a woman’s lips preparing to give or receive a kiss and they originate from the town of Tortona in the northwestern Italian region of Piedmont.

These two-bite cookies are eaten all over Italy and in some areas the hazelnuts are substituted for almonds or a mix of almonds and hazelnuts. I have opted for a mix of both nuts because I love how they complement each other.

The cookies are buttery, slightly crispy from the nuts, almost shortbread-like, and the chocolate filling is really what makes them unique. S and I enjoyed them so much we couldn’t bear to share them with anyone else. Yes, they are that good, especially with a cup of espresso.
Happy baking!

Baci di Dama (Lady’s Kisses) – Italian Hazelnut and Almond Cookies with Chocolate Filling
Heavily adapted from here
If you only have hazelnuts at hand or only almonds, then by no means use just that but I find that the mix of both nuts make the cookies more interesting.
I used blanched hazelnuts but you can also use hazelnuts with skin. You’ll need to roast them on a baking sheet for about 10 minutes in a 175 degrees Celsius / 350 Fahrenheit preheated oven, checking them regularly and being careful not to burn them. Remove them from the oven and place them on a clean kitchen towel. Once cool, rub them while still inside the towel to remove their skins and use according to the recipe below. (No need to further toast them).
I used blanched almonds but in case you only have almonds with skin it’s very easy to blanch them yourself. Put them in a bowl and pour boiling water over them. Let them stand for 1 minute (not more as they'll lose their crunchiness), drain them, rinse them under cold running water so that they're cool enough to handle, and drain them again. Place them on a clean kitchen towel and squeeze the skin off with your fingers. Pat them dry and they're ready to use.

Yield: 36 cookies
Ingredients
70 g blanched hazelnuts
70 g blanched almonds
100 g unsalted butter, at room temperature, cut in pieces
140 g all-purpose flour
Pinch of sea salt
100 g caster sugar
80 g good quality dark chocolate 55-60% cocoa solids, for the filling
Special equipment: small food processor, sieve, plastic wrap, 1-2 baking sheets, baking paper
Preparation
In a skillet or sauté pan, add the blanched hazelnuts and almonds and place over a medium heat. Toast the nuts, stirring often so they don’t get burned, until they become fragrant and brown lightly. Transfer them to a plate and let them cool completely.
Add the toasted nuts to a food processor and finely grind them, being careful not to grind them too much or they’ll start releasing their natural oils and become pasty. You don’t want that.
In a large bowl, add the butter and salt and sieve the flour over. Mix with your hands, rubbing the butter into the flour until almost pea-sized lumps form. Add the sugar and ground nuts and continue mixing with your hands.


When the mixture comes together into a rough dough, empty it onto a clean work surface. It will be crumbly and coarse, and may appear like it will not come together into a smooth dough but it will. Start kneading the mixture with your hands. This will soften the butter and it will be incorporated and dispersed throughout the dough. After 3-4 minutes you should have a smooth dough that holds together.
Shape the dough into a log, wrap it with plastic wrap and place it in the refrigerator for 15 minutes.


Line your baking sheets with baking paper.
Unwrap the dough, and cut and shape into small balls (a little larger than a hazelnut). Place them onto the prepared baking sheets, spacing them 2-3 cm apart because they will spread a little while baking. Place them in the fridge for 10-15 minutes and preheat your oven to 160 degrees Celsius / 325 Fahrenheit.


Place the baking sheet on the middle rack of the preheated oven and bake cookies for 14-16 minutes, until set to the touch and lightly golden. Be careful not to burn them. Check them after 12 minutes and if you see that they’re starting to catch at the bottom, transfer the baking sheet to a higher rack.
The cookies should be dome-y, not flat when baked.
Remove the baking sheet from the oven and place the second one in.
Transfer cookies on a wire rack to cool.
While the cookies are cooling, melt the chocolate in a bowl set over a pan of barely simmering water, stirring often and making sure the chocolate doesn't burn. The bottom of the bowl must not come in contact with the simmering water. Once chocolate has melted and is smooth, remove the bowl from the top of the pan, and allow chocolate to cool slightly before using it to fill the cookies. It will be easier to fill them when the melted chocolate has set a bit, as it will not run out from the sides of the cookies.


Line pairs of cookies on a wire rack and add small dollops of melted chocolate in the middle of one of the two cookies of each pair, using the smallest teaspoon you have. Sandwich the two cookies together and place them upright on a rack until the chocolate sets.
You can store the cookies in a cookie tin for up to 1 week.


I have cousins and second cousins living in Florence and Sicily and even though they don’t speak Greek, which is a shame, I speak Italian so thankfully communication has never been a problem between us.

The first time I went to Italy, it was for one of my cousins’ wedding. I was about thirteen, she was twenty-four and the happiest bride I have ever seen. As she is Catholic and I’m Orthodox, her wedding ceremony was very intriguing and completely different than anything I have ever experienced before. Everything was extraordinary; the church, the priest, the rituals. The only thing that was familiar to me was the abundance of food at the wedding reception. In that respect, I felt like I was home.

And the deliciousness didn’t stop there. The days leading to the wedding as well as those after, were filled with feasts as well. My aunt’s side of the family, the Italians, were feeding us pasta, pizze, meat stews, sfogliatelle and crostate, and my uncle’s side of the family, the Greeks, were making mousaka, giouvetsi, roast lamb and galaktoboureko.


I will never forget that first time in Italy nor my cousin’s wedding and I most certainly will never forget the food. My aunt always had some sweet nibbles around the house and apart from the confetti, which are candy-covered almonds traditionally given at Italian (and Greek) weddings, there were all sorts of cookies. Baci di dama is the one kind of cookie I remember vividly.

Baci di dama, meaning lady’s kisses, consist of two small hazelnut cookies sandwiched together with a dollop of dark chocolate. They are given that name because they resemble a woman’s lips preparing to give or receive a kiss and they originate from the town of Tortona in the northwestern Italian region of Piedmont.

These two-bite cookies are eaten all over Italy and in some areas the hazelnuts are substituted for almonds or a mix of almonds and hazelnuts. I have opted for a mix of both nuts because I love how they complement each other.

The cookies are buttery, slightly crispy from the nuts, almost shortbread-like, and the chocolate filling is really what makes them unique. S and I enjoyed them so much we couldn’t bear to share them with anyone else. Yes, they are that good, especially with a cup of espresso.
Happy baking!

Baci di Dama (Lady’s Kisses) – Italian Hazelnut and Almond Cookies with Chocolate Filling
Heavily adapted from here
If you only have hazelnuts at hand or only almonds, then by no means use just that but I find that the mix of both nuts make the cookies more interesting.
I used blanched hazelnuts but you can also use hazelnuts with skin. You’ll need to roast them on a baking sheet for about 10 minutes in a 175 degrees Celsius / 350 Fahrenheit preheated oven, checking them regularly and being careful not to burn them. Remove them from the oven and place them on a clean kitchen towel. Once cool, rub them while still inside the towel to remove their skins and use according to the recipe below. (No need to further toast them).
I used blanched almonds but in case you only have almonds with skin it’s very easy to blanch them yourself. Put them in a bowl and pour boiling water over them. Let them stand for 1 minute (not more as they'll lose their crunchiness), drain them, rinse them under cold running water so that they're cool enough to handle, and drain them again. Place them on a clean kitchen towel and squeeze the skin off with your fingers. Pat them dry and they're ready to use.

Yield: 36 cookies
Ingredients
70 g blanched hazelnuts
70 g blanched almonds
100 g unsalted butter, at room temperature, cut in pieces
140 g all-purpose flour
Pinch of sea salt
100 g caster sugar
80 g good quality dark chocolate 55-60% cocoa solids, for the filling
Special equipment: small food processor, sieve, plastic wrap, 1-2 baking sheets, baking paper
Preparation
In a skillet or sauté pan, add the blanched hazelnuts and almonds and place over a medium heat. Toast the nuts, stirring often so they don’t get burned, until they become fragrant and brown lightly. Transfer them to a plate and let them cool completely.
Add the toasted nuts to a food processor and finely grind them, being careful not to grind them too much or they’ll start releasing their natural oils and become pasty. You don’t want that.
In a large bowl, add the butter and salt and sieve the flour over. Mix with your hands, rubbing the butter into the flour until almost pea-sized lumps form. Add the sugar and ground nuts and continue mixing with your hands.


When the mixture comes together into a rough dough, empty it onto a clean work surface. It will be crumbly and coarse, and may appear like it will not come together into a smooth dough but it will. Start kneading the mixture with your hands. This will soften the butter and it will be incorporated and dispersed throughout the dough. After 3-4 minutes you should have a smooth dough that holds together.
Shape the dough into a log, wrap it with plastic wrap and place it in the refrigerator for 15 minutes.


Line your baking sheets with baking paper.
Unwrap the dough, and cut and shape into small balls (a little larger than a hazelnut). Place them onto the prepared baking sheets, spacing them 2-3 cm apart because they will spread a little while baking. Place them in the fridge for 10-15 minutes and preheat your oven to 160 degrees Celsius / 325 Fahrenheit.


Place the baking sheet on the middle rack of the preheated oven and bake cookies for 14-16 minutes, until set to the touch and lightly golden. Be careful not to burn them. Check them after 12 minutes and if you see that they’re starting to catch at the bottom, transfer the baking sheet to a higher rack.
The cookies should be dome-y, not flat when baked.
Remove the baking sheet from the oven and place the second one in.
Transfer cookies on a wire rack to cool.
While the cookies are cooling, melt the chocolate in a bowl set over a pan of barely simmering water, stirring often and making sure the chocolate doesn't burn. The bottom of the bowl must not come in contact with the simmering water. Once chocolate has melted and is smooth, remove the bowl from the top of the pan, and allow chocolate to cool slightly before using it to fill the cookies. It will be easier to fill them when the melted chocolate has set a bit, as it will not run out from the sides of the cookies.


Line pairs of cookies on a wire rack and add small dollops of melted chocolate in the middle of one of the two cookies of each pair, using the smallest teaspoon you have. Sandwich the two cookies together and place them upright on a rack until the chocolate sets.
You can store the cookies in a cookie tin for up to 1 week.


