Making bread is perhaps the most fulfilling act of “cooking” I do in my kitchen. I have described it many times before and this one won’t be any different. It gives me an utter sense of accomplishment when a good loaf of bread comes out of the oven, when that intoxicating smell of warm bread fills my nostrils and the sound of its crust cracking fills my ears.

The kneading, that sometimes soft and at other times hard rocking movement, almost meditative, makes me get lost in my thoughts only to be awakened by a soft dough underneath my fingers.

The shaping, the tucking of the dough, gently laying it on a warm towel and then waiting for it to proof, to become airy and light and plump. And then the final shaping, the punching of the dough, the degassing, where you can almost hear it puffing and huffing the air out.

The baking, the aroma, the anticipation, the warmth, the memories. When it comes out, it looks all puffed and scorched in the most gentle of ways, or like it has been through hell, all misshaped and yet beautiful.
That’s what bread is all about.
Yeast, flour, water.

On some occasions, it’s even simpler than that. It’s just mixing it quickly yet attentively, and then letting it do its thing, what it is meant to do all along; rise and become alive. That’s the no-knead bread. It’s when you make bread by skipping some of the steps, for some cumbersome, for others essential. Me, I’m in the middle somewhere. I love everything there is to love about bread. At times I want it all, I can afford to go through every single step and nurture it to the great loaf we will enjoy with our dinner or in the morning, with butter and jam. And at other times, I need the whole process to be quick, I don’t have the time to spent nurturing it, I need it to be independent and yet I need it to be delicious and all that it can be. At those instances, I choose the no-knead bread.

This is a recipe that I have been playing around with for years, almost ever since it came out. It is a glorious recipe and one that allows you to mess around with it and find the version that you like most.

I have made this with whole wheat flour, spelt and rye flour, with fresh yeast, with instant yeast, with my own sourdough culture. It always comes out good; with variations in flavor depending on the flour and yeast used, and in texture depending on the humidity levels (Holland is notorious for its humidity thus affecting bread-making a great deal).

I have never been disappointed with this bread and even though you may find this recipe in a billion other places around the internet, here is my very own version with just a few tweaks that slightly alter the flavor of the bread to better suit our tastes. For those of you who haven’t yet discovered it or for those of you who need to be reminded of the beauty that is the no-knead bread, here it is.

No-Knead Bread
Adapted from Jim Lahey
The only thing that makes this recipe potentially difficult is the fact that you need a Dutch oven (or a clay or ceramic pan with lid) to bake the bread in. I have explained before in detail why and how this process works (in this post).
Also, I’m not sure if this bread could be baked on a pizza stone (with the help of ice cubes to create steam as explained in the same post), but I plan to try it in the future. I’ll keep you posted.
The more hours you leave the dough to proof the better. Lahey suggests 12 hours but I have the best results when I leave it for 18.
The flavor of this bread is reminiscent of sourdough. The addition of a small amount of sugar takes away that intense sourness which is something I prefer, but you can always omit the sugar if you want. The texture of the crumb is light and airy, with many large and smaller holes (one of the most enticing characteristics of this bread), whereas the crust is super crunchy and stays that way for a couple of days.
I have used many types of white wheat flour to make this bread and I have had the best results, better crust and flavor, with 00 flour with a high gluten content, about 12% (Italian 00 flour for pizza) (you can read detailed info about this type of flour in this post). A good alternative is strong white bread flour.

Yield: 1 loaf (about 700 g)
Ingredients
430 g strong white bread flour (or “00” flour for pizza)
¼ tsp instant dried yeast
1¼ tsp sea salt
½ tsp caster sugar
1 Tbsp olive oil
345 g water (from the tap)
Extra flour for flouring the work surface ant the dough
Special equipment: large bowl, long wooden spoon, plastic wrap, baking paper, cast-iron or ceramic pot with lid
Preparation
In a large bowl, add the flour, yeast, salt and sugar and mix with a wooden spoon. Add the water and olive oil and mix intensely with the wooden spoon for about 1 minute, until it comes together into a wet dough. Cover the bowl well with plastic wrap and leave it at room temperature to rest and proof for preferably 18 hours, but you can leave it anywhere from 12-20 hours.
I usually leave it in my living room where the temperature is 20-22 degrees Celsius / 68-71 Fahrenheit.


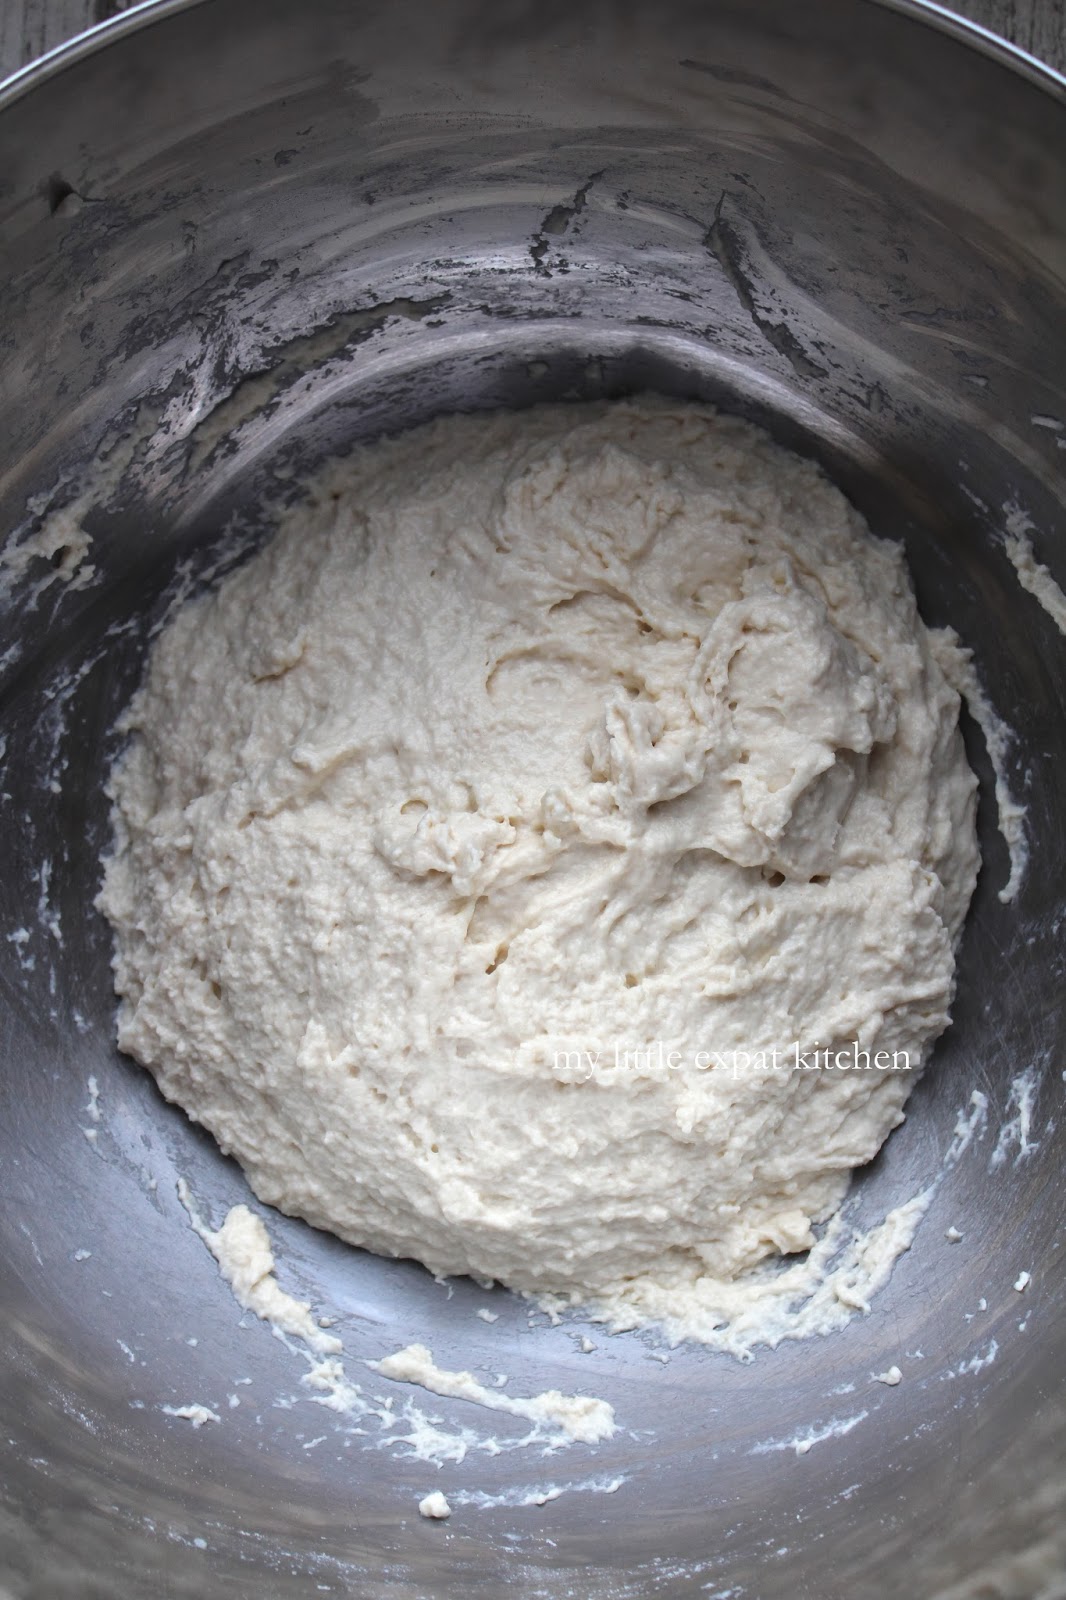

After 18 hours have passed, the dough should have more than tripled in volume and appear with a lot of tiny holes on top. Lay a large piece of baking paper on a clean work surface, dust generously with flour and empty the dough on top. Lightly flour the top of the dough, flour your hands and fold the dough four times (once from each side). Cover the dough loosely with plastic wrap and leave to rest for 15 minutes.
Note: Having made this bread numerous times, I have to say that almost every time, the dough is different. Sometimes it's very wet, others not so much and at other times firmer than usual. This is due to environmental changes (like humidity) rather than the recipe itself which always remains constant. So do not worry if your dough turns out more wet than mine. It happens. This time that I took photos, it actually turned out quite firm.


Take a baking sheet and lay a large clean kitchen towel on top (no fluffy kind of towel). Dust the towel well with flour, or you can also use cornmeal.
Flour your hands and fold the dough again four times (once from each side), stretching it if needed, turn it upside down (folds should be underneath) and try to shape it into a rough ball. It will be sticky so don’t worry if you can’t really shape it well. Place it (seam-side down) on the floured kitchen towel. Flour the top of the dough lightly and fold the towel on top. Leave the dough to proof and almost double in size for 2 hours.


Thirty minutes before the 2 hours have passed, place your cast-iron or ceramic pan with lid in the oven and preheat to 225 Celsius / 435 Fahrenheit.
When the oven has preheated, remove the pan from the oven and quickly add the dough, seam-side up, into the pan and close the lid. Place pan immediately in the oven and bake the bread for 30 minutes. Then remove the lid and bake for a further 17-18 minutes, until the bread has a nice golden-brown crust.


Remove the pan from the oven, allow the bread to stand for 5 minutes in the pan and then transfer it on a wire rack to cool. I can never restrain myself and I always break a piece off as it is still warm.
You can keep the bread covered with a clean kitchen towel for a couple of days.
Use it for a nice lunch with poached eggs on top, eat it with your dinner or for breakfast with your favorite jam.
Enjoy and do let me know if you try it!

The kneading, that sometimes soft and at other times hard rocking movement, almost meditative, makes me get lost in my thoughts only to be awakened by a soft dough underneath my fingers.
The shaping, the tucking of the dough, gently laying it on a warm towel and then waiting for it to proof, to become airy and light and plump. And then the final shaping, the punching of the dough, the degassing, where you can almost hear it puffing and huffing the air out.
The baking, the aroma, the anticipation, the warmth, the memories. When it comes out, it looks all puffed and scorched in the most gentle of ways, or like it has been through hell, all misshaped and yet beautiful.
That’s what bread is all about.
Yeast, flour, water.
On some occasions, it’s even simpler than that. It’s just mixing it quickly yet attentively, and then letting it do its thing, what it is meant to do all along; rise and become alive. That’s the no-knead bread. It’s when you make bread by skipping some of the steps, for some cumbersome, for others essential. Me, I’m in the middle somewhere. I love everything there is to love about bread. At times I want it all, I can afford to go through every single step and nurture it to the great loaf we will enjoy with our dinner or in the morning, with butter and jam. And at other times, I need the whole process to be quick, I don’t have the time to spent nurturing it, I need it to be independent and yet I need it to be delicious and all that it can be. At those instances, I choose the no-knead bread.
This is a recipe that I have been playing around with for years, almost ever since it came out. It is a glorious recipe and one that allows you to mess around with it and find the version that you like most.
I have made this with whole wheat flour, spelt and rye flour, with fresh yeast, with instant yeast, with my own sourdough culture. It always comes out good; with variations in flavor depending on the flour and yeast used, and in texture depending on the humidity levels (Holland is notorious for its humidity thus affecting bread-making a great deal).
I have never been disappointed with this bread and even though you may find this recipe in a billion other places around the internet, here is my very own version with just a few tweaks that slightly alter the flavor of the bread to better suit our tastes. For those of you who haven’t yet discovered it or for those of you who need to be reminded of the beauty that is the no-knead bread, here it is.
No-Knead Bread
Adapted from Jim Lahey
The only thing that makes this recipe potentially difficult is the fact that you need a Dutch oven (or a clay or ceramic pan with lid) to bake the bread in. I have explained before in detail why and how this process works (in this post).
Also, I’m not sure if this bread could be baked on a pizza stone (with the help of ice cubes to create steam as explained in the same post), but I plan to try it in the future. I’ll keep you posted.
The more hours you leave the dough to proof the better. Lahey suggests 12 hours but I have the best results when I leave it for 18.
The flavor of this bread is reminiscent of sourdough. The addition of a small amount of sugar takes away that intense sourness which is something I prefer, but you can always omit the sugar if you want. The texture of the crumb is light and airy, with many large and smaller holes (one of the most enticing characteristics of this bread), whereas the crust is super crunchy and stays that way for a couple of days.
I have used many types of white wheat flour to make this bread and I have had the best results, better crust and flavor, with 00 flour with a high gluten content, about 12% (Italian 00 flour for pizza) (you can read detailed info about this type of flour in this post). A good alternative is strong white bread flour.
Yield: 1 loaf (about 700 g)
Ingredients
430 g strong white bread flour (or “00” flour for pizza)
¼ tsp instant dried yeast
1¼ tsp sea salt
½ tsp caster sugar
1 Tbsp olive oil
345 g water (from the tap)
Extra flour for flouring the work surface ant the dough
Special equipment: large bowl, long wooden spoon, plastic wrap, baking paper, cast-iron or ceramic pot with lid
Preparation
In a large bowl, add the flour, yeast, salt and sugar and mix with a wooden spoon. Add the water and olive oil and mix intensely with the wooden spoon for about 1 minute, until it comes together into a wet dough. Cover the bowl well with plastic wrap and leave it at room temperature to rest and proof for preferably 18 hours, but you can leave it anywhere from 12-20 hours.
I usually leave it in my living room where the temperature is 20-22 degrees Celsius / 68-71 Fahrenheit.
After 18 hours have passed, the dough should have more than tripled in volume and appear with a lot of tiny holes on top. Lay a large piece of baking paper on a clean work surface, dust generously with flour and empty the dough on top. Lightly flour the top of the dough, flour your hands and fold the dough four times (once from each side). Cover the dough loosely with plastic wrap and leave to rest for 15 minutes.
Note: Having made this bread numerous times, I have to say that almost every time, the dough is different. Sometimes it's very wet, others not so much and at other times firmer than usual. This is due to environmental changes (like humidity) rather than the recipe itself which always remains constant. So do not worry if your dough turns out more wet than mine. It happens. This time that I took photos, it actually turned out quite firm.
Take a baking sheet and lay a large clean kitchen towel on top (no fluffy kind of towel). Dust the towel well with flour, or you can also use cornmeal.
Flour your hands and fold the dough again four times (once from each side), stretching it if needed, turn it upside down (folds should be underneath) and try to shape it into a rough ball. It will be sticky so don’t worry if you can’t really shape it well. Place it (seam-side down) on the floured kitchen towel. Flour the top of the dough lightly and fold the towel on top. Leave the dough to proof and almost double in size for 2 hours.
Thirty minutes before the 2 hours have passed, place your cast-iron or ceramic pan with lid in the oven and preheat to 225 Celsius / 435 Fahrenheit.
When the oven has preheated, remove the pan from the oven and quickly add the dough, seam-side up, into the pan and close the lid. Place pan immediately in the oven and bake the bread for 30 minutes. Then remove the lid and bake for a further 17-18 minutes, until the bread has a nice golden-brown crust.
Remove the pan from the oven, allow the bread to stand for 5 minutes in the pan and then transfer it on a wire rack to cool. I can never restrain myself and I always break a piece off as it is still warm.
You can keep the bread covered with a clean kitchen towel for a couple of days.
Use it for a nice lunch with poached eggs on top, eat it with your dinner or for breakfast with your favorite jam.
Enjoy and do let me know if you try it!