Tampilkan postingan dengan label pork. Tampilkan semua postingan

Minggu, 28 Desember 2014

Greek roasted pork loin with petimezi (grape molasses)


Hello all. I hope you had a wonderful Christmas and enjoyed good food with your loved ones.


Are you full yet? I know I am. But that doesn’t stop me from eating some more. Well, it is the holidays after all. I can feel guilty about it afterwards. For the time being, let me rejoice in the food and the people I love. I suggest you do the same.


Greeks traditionally eat pork on Christmas and/or on New Year's. So if you would like to feast like a Greek, let me share with you a recipe for pork loin with petimezi that is truly delicious, if I do say so myself.


Petimezi is Greek grape molasses which comes from moustos (grape must). The thick, viscous petimezi is used in Greek cuisine as a condiment in salad dressings, to enrich sauces for meat and poultry, with eggs, cheese, in traditional cakes and cookies named moustokouloura, you name it. Here, I used it as part of a glaze along with mustard and olive oil.


The pork, slathered with the glossy glaze, sits on a bed of garlic heads cut in half, sliced juicy oranges and lemons, and whole, aromatic fresh herbs like rosemary, thyme and sage. Everything gets a generous drizzle of olive oil and the pork is roasted in the oven. After an hour, out comes the succulent meat.


The pork’s crust is slightly caramelized and underneath hides the juicy and tender meat. The fragrance of the citrus, of the sweet and sour petimezi, of the herbs and the mustard has permeated the pork and its flavor is now sweet, tangy and zesty. The sauce, made from the deglazed pan juices, petimezi (again) and balsamic vinegar, finished off with some butter to give it a beautiful sheen, completes the picture. Poured all over the slices of supple meat, it is a wonderful combination and a winner on a festive table.

I wish you all a Happy New Year with health and happiness!


Petimezi and mustard-glazed roasted pork loin with herbs and citrus fruits, and a petimezi and balsamic vinegar sauce

Pork loin is lean so it needs careful cooking as it can dry out very easily. Having a meat thermometer is very handy to ensure that it’s cooked properly.

I love serving it with the garlic that has cooked down to soft, plump cloves and with the herbs, picking some with each bite to give extra flavor to the meat. Roast potatoes, rice or celeriac purée and a big salad would make great accompaniments.

Don’t be tempted to serve the pork without the sauce. It needs it, not only for flavor but for moistness.
I didn’t add any flour to the sauce because I didn’t want it to be thick, but if you prefer it on the thick side, add half a teaspoon to a teaspoon of flour or corn flour.


Yield: 6 servings

Ingredients
1.2 kg center-cut pork loin (with a little fat on top, no bones), tied (you can ask your butcher to tie it for you if can’t do it)
1 large orange, sliced thickly
1 lemon, sliced
2 heads of garlic, cut in half crosswise
4-5 fresh rosemary sprigs
5 fresh sage sprigs
5-6 fresh thyme sprigs
Salt
Freshly ground black pepper
6 Tbsp olive oil
½ cup water

for the glaze
4 Tbsp Greek petimezi (grape-must syrup/grape molasses)
2 Tbsp mild-flavored mustard

for the sauce
200 ml chicken stock
2 Tbsp petimezi
½ Tbsp balsamic vinegar
Freshly ground black pepper
1½ Tbsp unsalted butter

Special equipment: large baking pan (preferably suitable also for the stovetop), pastry brush, meat thermometer, sieve


Preparation
Take the pork out of the fridge at least half an hour before cooking so it can come to room temperature.

Preheat your oven to 190ºC.

Arrange the orange and lemon slices in a baking pan in one layer. Place wider slices in the center so the pork can sit on them comfortably. Add the half garlic heads between the citrus slices. Arrange the whole sprigs of rosemary, sage and thyme mainly in the middle of the pan.


Prepare the glaze by whisking the petimezi and mustard in a small bowl to combine.

Rinse the pork and pat it dry with paper towels. Rub it well all over with 3 Tbps olive oil and season it well all over with salt and freshly ground black pepper.
Transfer it to the middle of the pan (fat-side up), on top of the citrus slices and fresh herbs and using a pastry brush, brush the top and sides with some of the glaze (see photo). Drizzle the remaining 3 Tbps of olive oil over the citrus fruits around the pan and pour in also the water.


Place the pan on the low rack of your preheated oven and roast for 20 minutes. Take it out and glaze the pork with the glaze mixture using the pastry brush. Make sure to be very gentle so you don’t remove the previous layer of glaze.
Roast for a further 20 minutes on the low rack of the oven. During roasting, check if the pan is dry and if so, add a little more water.
Take the pan out and glaze the pork for the last time with the glaze mixture, being gentle again with the brush. Place the pan on the middle rack of the oven this time and roast the pork for a further 20 minutes or until a meat thermometer inserted in the middle of the loin reads 65ºC.

Take the pan out of the oven and remove the pork from the pan and onto a board. The temperature of the pork will continue to rise while resting, a couple of degrees. You can cover it very loosely with aluminum foil if you wish to keep it warm.

While the pork rests, prepare the sauce. Remove the garlic and herbs from the pan. Press the orange and lemon slices through a sieve to get their juice, letting it fall into the pan. Discard the citrus slices.
Place the baking pan on the stovetop over medium heat and pour in the chicken stock. Using a wooden spoon, deglaze the pan. Take it off the heat and pour the liquid through a sieve and into a small saucepan.

Note: In case your baking pan/dish can't be put on the stovetop (for example, clay pots may break when put on direct heat), add the chicken stock to the pan and return pan to the oven (which you have kept at 190ºC) for 5-10 minutes or until the stock starts to simmer. Remove pan from the oven and deglaze, using a wooden spoon. Continue with the recipe instructions as described above.

To the saucepan, add the petimezi and balsamic vinegar as well as a little black pepper, set over medium-high heat and let it simmer and reduce by a third. Don’t let it get syrupy, it needs to be on the thin side. Add the butter and whisk it in. Check the seasoning and add salt if you think it needs it. Don’t add salt in the beginning because the flavor of the sauce concentrates as it cooks down so it may be too salty.

To serve, cut off and discard the twine from the pork carefully so you don't remove the crust and discard it. Place the pork on a platter and drizzle it with a little olive oil. Pour the sauce in a small container with a spout so you can add as much or as little as you wish. Slice the pork and pour the sauce over it.
Serve with the garlic and herbs.

Enjoy!


Kamis, 18 Desember 2014

Oven-baked sweet and spicy spare ribs

As I was talking to my mom on the phone the other day, she said, “Oh, I forgot to tell you. D (my brother) decided to become a vegetarian”. The phone almost fell from my hand and I began laughing. She had to repeat that statement at least six times before I finally believed her. D a vegetarian? Whaaat?? D who when we were growing up used to steal the pork chops from my plate? D whose portion of kokkinisto (Greek veal stew cooked in tomato sauce) was at least half a kilo?? I never saw that coming, to say the least.


So, to get on his nerves, as a proper sister should do, and tempt him, even though I doubt he will be tempted, he’s a strong-willed person, I’m posting these spare ribs in his honor.


But besides my brother, there’s you, and since the holidays are upon us, I’d like to share this recipe for spare ribs with you as well as my view on holiday dinners. When you reach the point where you have been cooking Christmas and New Year’s dinners for family, friends and loved ones for some years, you get bored with the same kinds of dishes. Sure, turkey is great, a big ham is excellent, but there are so many meat dishes you can choose to cook apart from those that are, well, boring.


Spare ribs. They may be messy to eat, you may need to use your hands (who am I kidding, you’ll most definitely need to use your hands), and you may have to steal the last piece from your fellow diners, but you will be rewarded with happy people enjoying a fulfilling meal that’s absolutely delicious and holiday-worthy. And, you will not be too tired after preparing it, cause it is so very easy. It only needs fifteen minutes of your time.


You prepare the spice and sugar rub, you rub it all over the ribs, wrap them in foil and bake them in the oven for three and a half hours. When they’re ready, you pour the juices in a small pan, add some vinegar and reduce a bit to create a thick-ish sauce that you pour over the caramelized, sweet and spicy, smoky and hot spare ribs. They are pure sin, with the tender, juicy, falling off the bone meat that melts in the mouth, and the spicy and slightly acidic sauce that balances the sweetness.


They are ideal for those occasions, holidays or not, that you want to share with your closest friends and family, those who don’t mind eating with their hands, those who won’t look you the wrong way when you reach for the beer bottle with greasy hands. In a nutshell, the people we all should be spending our holidays with.


PS 1: Thank you to everyone for your kind wishes on my last post. Your support means a lot!

PS 2: I have nothing against vegetarians. I hope they have nothing against me either.


Oven-baked sweet and spicy spare ribs
Slightly adapted from The New York Times

Serve them with thinly-cut (matchstick) fried potatoes (like the ones in the photos), or roast potatoes, a big green salad or slaw to give freshness to the meal and to balance the sweetness, spiciness and richness of the pork.
We love heat in our ribs but if you can’t stand the heat of chilli, add a little less.


Yield: more than enough for 4

Ingredients
1.7 – 2 kg spare ribs

for the rub
200 g (about 1 cup) soft dark brown sugar
2 Tbsp chilli powder (add 1 Tbsp if you can’t handle very spicy flavors)
2 tsp pimentón de la Vera, dulce (Spanish sweet smoked paprika), (add regular sweet paprika if you can’t find pimentón)
2 tsp garlic powder
2 tsp sea salt
½ tsp ground cinnamon
¼ tsp ground cloves

for the sauce
the juices from the cooked spare ribs
1 Tbsp red wine vinegar

Special equipment: large baking pan, aluminum foil, baking paper


Preparation
Rinse the spare ribs and pat them dry with kitchen paper. They should fit in one large baking pan in one layer. I buy two long slabs and they fit in my somewhat small oven in one layer perfectly. If yours don’t, cut them into two slabs.

Preheat your oven to 150°C.

In a medium bowl, add all the ingredients for the rub and mix with a fork or whisk to blend.


Take two large pieces of aluminum foil (large enough to fold around the spare ribs) and lay each one on your kitchen counter. Sprinkle some of the rub mixture along the center of each piece of foil and place a slab of spare ribs (meat-side down) on each aluminum foil piece, on top of the rub. Sprinkle each slab with the rest of the rub and rub it well on all sides with your hands.

Keeping the ribs meat-side down, fold the foil to create two tightly sealed packets. Be careful not to tear the foil or make any small holes.

Line your baking pan with baking paper and place the packets on the baking pan, one next to the other, making sure the seal of the foil faces upwards otherwise juices may run out. The reason you add baking paper to the baking pan is because sometimes juices may run out, causing the aluminum foil to stick to the pan thus making it hard to remove the packet from the pan without tearing the foil and losing the juices.


Place on the middle rack of your preheated oven and bake the ribs for 3½ hours, turning the pan front to back halfway through.
They are ready when a fork easily penetrates the meat.

Remove the pan from the oven. Unfold carefully each packet and pour the accumulated juices into a small saucepan. Fold the foil again to keep spare ribs warm.

Place the saucepan over medium heat and stir in vinegar. Simmer the sauce until it reduces by a third, being careful not to over-reduce it to the point that it becomes syrupy and too sticky.

Serve the spare ribs on a large platter, whole or portioned, with the sauce on the side so that everyone can add as much or as little as they want on top.

Enjoy!


Minggu, 04 Juli 2010

Family ties

My mom says that I got the knack for cooking from my grandfather and that always brings a huge smile to my face. I loved my grandfather tremendously. He was a very important figure in my life and a very talented person. He was a painter, a sculptor and a home cook and whenever he was cooking or working on his art, he was always whistling. Sometimes I can still hear his whistle if I close my eyes and concentrate hard enough...


My grandfather loved to cook. He would stay in the kitchen for hours, preparing marmalades and jams, pies and breads, all kinds of savory dishes and desserts. He liked to experiment with different ingredients and he used to watch French cooking shows on satellite tv, trying to pick up new ideas for dishes and constantly coming up with new recipes. What he also did, was make sure to take the credit for whatever he had cooked, letting everyone know that he was the one responsible for the delicious food on the table and not my grandmother. He was funny that way.


He had a summer house by the sea where my brother and I spent every summer with him and my grandmother. He used to dive and catch mussels, clams and octopi for us all the time. There is a specific image of him etched in my mind. He, sitting at the veranda with a big plate of raw, freshly caught clams on his lap, prying them open one by one with the help of a huge knife, squeezing a couple of drops of lemon over them and then quickly sucking them down with a loud, slurping sound.


To him, eating was a ritual. He sat at the head of the table, enjoyed every single bite and he demanded that the bread basket and the bottle of ouzo were always situated next to him. He couldn't live without his crusty bread and his shot of ouzo. The practice of sitting at the dinner table and savoring the meal for more than an hour or sometimes hours if having company, nibbling on various mezedes (plural for mezes) and sipping ouzo, is characteristic of all the Greeks from Constantinople (Istanbul). My grandfather was born and raised in Constantinople or 'Poli' as we Greeks call it for short. He lived there until his mid-30s and then moved to Piraeus, Greece with my grandmother- who was originally a Greek from Poli and the city of Smyrna- and their two children; my mom and my uncle.


What they brought with them, as every other Greek from Poli did, was a food culture very much distinguished from the traditional Greek one. A food culture and a type of cooking influenced and shaped by the intermingling of the traditional Greek culinary customs and those of Anatolia (Asia Minor). The extensive use of spices, the utter importance of food in everyday life, the celebratory way of viewing food in general, are elements that are deeply rooted in my family's culinary consciousness. The type of cooking of the Greeks from Poli is called 'Politiki Cuisine'.
You can catch a glimpse of what it means to be a Greek from Constantinople and the importance of food, in the wonderful Greek movie 'A touch of spice' ('Politiki Kouzina').


I was brought up with that kind of cooking. My earliest memories of food include lots of spices and heavy sauces, an array of dishes, the names of which I couldn't even pronounce because of their Turkish origin, and a reverence toward the ritual of eating, especially when we had guests. The abundance of food served at a gathering was, and still is at such occasions, monumental. If just the main meal and a salad are on the table, it is considered shameful by my grandmother and my mom. They need to have at least five or six dishes of mezedes around to call it a proper meal.


Pastourmas (seasoned air-cured beef), soutzouki (a dry and very spicy sausage), dolmadakia (grape vines stuffed with rice and mint), soutzoukakia (beef patties in a tomato sauce), piazi beans (white bean salad with onions, parsley, olive oil and vinegar), Politiki salad (grated carrot and white cabbage tossed with vinegar and olive oil), eggplant imam baildi (stuffed eggplants with onions and tomato), tas kebab (beef or lamb in a spicy red sauce), hunkiar beyiendi (an eggplant purée with diced meat) are a sample of Politiki Cuisine along with the famous desserts like baklava, ekmek kataifi and a delicious and refreshing drink called airani (yoghurt mixed with water and salt).


I could go on and on with a never-ending list of dishes. I want to dedicate a post to each and every one of them and I will at some point, but as an introduction to Politiki Cuisine I chose one of my favorite dishes in the world; Manti. (Manti is the name of the dish but manti is also the name of each small pouch of filled pasta. The plural is also manti). I am so excited to be sharing this recipe with all of you. Manti are the Greek-Turkish original ravioli or tortellini. I'm sorry to any Italians out there but the Turks came up with this dish first.
Manti is actually a dumpling with a pasta-type dough, filled with ground meat, usually lamb or beef, mixed with spices and it is either boiled, steamed or baked in the oven. It is served with a yoghurt sauce and red pepper and there are versions of it that call for an additional tomato sauce though I find that to be too much.


Making your own dough for the manti is crucial. There are those who use wonton or other ready-made wraps but I prefer the old fashioned way of making my own. It is a fairly easy process of combining flour with water, though you may find that in most Turkish versions of this recipe they tend to add eggs. The Greek version is a bit lighter.
For the filling, I prefer using a mixture of ground beef and pork, bulgur wheat and spices. The pork doubtlessly adds some extra flavor to the manti and the bulgur, which is widely used in Politiki Cuisine, gives a nutty flavor to the overall dish. The filled manti are baked in the oven and once they are almost cooked, they are drenched in beef stock and put again in the oven to soak up all the juices. The dish is served with a sauce of Greek strained yoghurt and mashed garlic and it is topped with ground red hot pepper and sumac.


It is an immensely tasty and aromatic dish and its authenticity and rustic quality makes it unique. The cooked dough is crunchy and browned on top and deliciously moist at the bottom, overflowing with all the scrumptious juices from the meat and melted butter. The nutty flavor of the bulgur is a perfect match for the pungent spices. It has a superb spicy flavor and I have to admit, it is rather heavy. The yoghurt-garlic sauce on top, as well as the red pepper and sumac, add a complexity to the overall dish, giving it a hint of heat, sharpness and acidity, while the yoghurt succeeds in making it a bit lighter.


Delicious, healthy bulgur


Manti is a main dish that will surely fill you up and give you an incomparable tasting experience. It is ideally served with a simple salad of shredded carrot and cabbage dressed with olive oil and red wine vinegar. A carafe of ouzo or a tall glass of beer would be a fitting accompaniment to the dish.


Whenever I make this kind of dishes I feel a sense of accomplishment and a connection to my family's roots. I'm sure that if my grandfather was alive he would be very proud of me.
Do you ever feel the same way? Do you have a specific kind of cuisine that links you to your ancestors? Are there dishes that remind you of loved ones?


Politiko Manti (Greek pasta-type dough filled with minced meat and spices with a yoghurt-garlic sauce)

Manti is the name of the dish but manti is also the name of each small pouch of filled pasta. The plural is also manti.

This dish is truly exceptional but it does take a lot of time to prepare.

The recipe calls for beef stock. You can make your own, you can use canned beef stock or cubes.

In case you don't like pork, you can use just ground beef or a mix of ground beef and veal or lamb.

The yoghurt-garlic sauce contains 4 garlic cloves which might sound a lot, but that is the point. This is the way the dish is supposed to be. You can of course use less garlic or even more, depending on how much you enjoy it.

If you can't find the spice sumac, you can substitute with a little freshly grated lemon mixed with a pinch of salt.


Yield: about 65 manti / 6-8 servings

Ingredients

for the dough
500 g all-purpose flour
1/2 tsp salt
280-290 ml tap water

for the filling
300 g ground beef
100 g ground pork
3 Tbsp olive oil
2 large onions, grated or finely chopped in the food processor
1/3 cup (65 g) bulgur wheat
2 heaped tsp tomato paste
1/8 tsp ground cinnamon
1/4 tsp ground allspice
1/4 tsp salt
1/8 tsp freshly ground black pepper

for the yoghurt-garlic sauce
500 g Greek strained yoghurt (preferably full fat)
4 medium-sized garlic cloves

750 ml hot beef stock
30 g unsalted butter at room temperature for greasing the baking dish
45 g plus 30 g melted unsalted butter for brushing the manti
Cayenne pepper, ground (or other red hot pepper such as the Greek boukovo or the Turkish pul biber or aleppo)
Sumac, ground (optional)

Special equipment: small food processor or large grater, large baking dish (the one I used was a 40 x 30 cm ceramic baking dish), garlic press or mortar and pestle, rolling pin


Preparation

Make the dough
In a large bowl, add the flour and salt and mix them with a fork. Make a well in the middle with your hand and add 100 ml of the water. Mix everything with your hands and continue adding water little by little. You might need a little less or a little more water so adding it to the flour a little at a time ensures that you don't end up with a watery and sticky dough.
Continue mixing the water and the flour with your hands until a dough forms. Turn the dough over to a lightly floured surface and knead it for about 8 minutes until you have a tight and firm dough. Place it inside a lightly floured bowl and cover it with a tea towel. Let it rest for 1 - 1 1/2 hours in a cool place (not in the refrigerator).


Make the filling
In a large bowl, add all the ingredients for the filling and mix everything together with your hands for about 5 minutes, until all the ingredients are well blended. Cover the bowl with plastic wrap and put it in the fridge for half an hour so that the flavors of the filling have a little time to blend.

Make the manti
Lightly dust your work surface, your hands and your rolling pin with flour.
Divide the dough into 10 equal pieces.
Take one piece of dough, roll it in between your hands to make a ball and then roll it out, using the rolling pin, into a large square with a thickness of a little less than 0.5 cm. Then, using a knife, cut the large square into smaller squares (6 x 6 cm). (Make sure the squares are floured enough so that the small manti won't stick together when you place them in the baking dish).

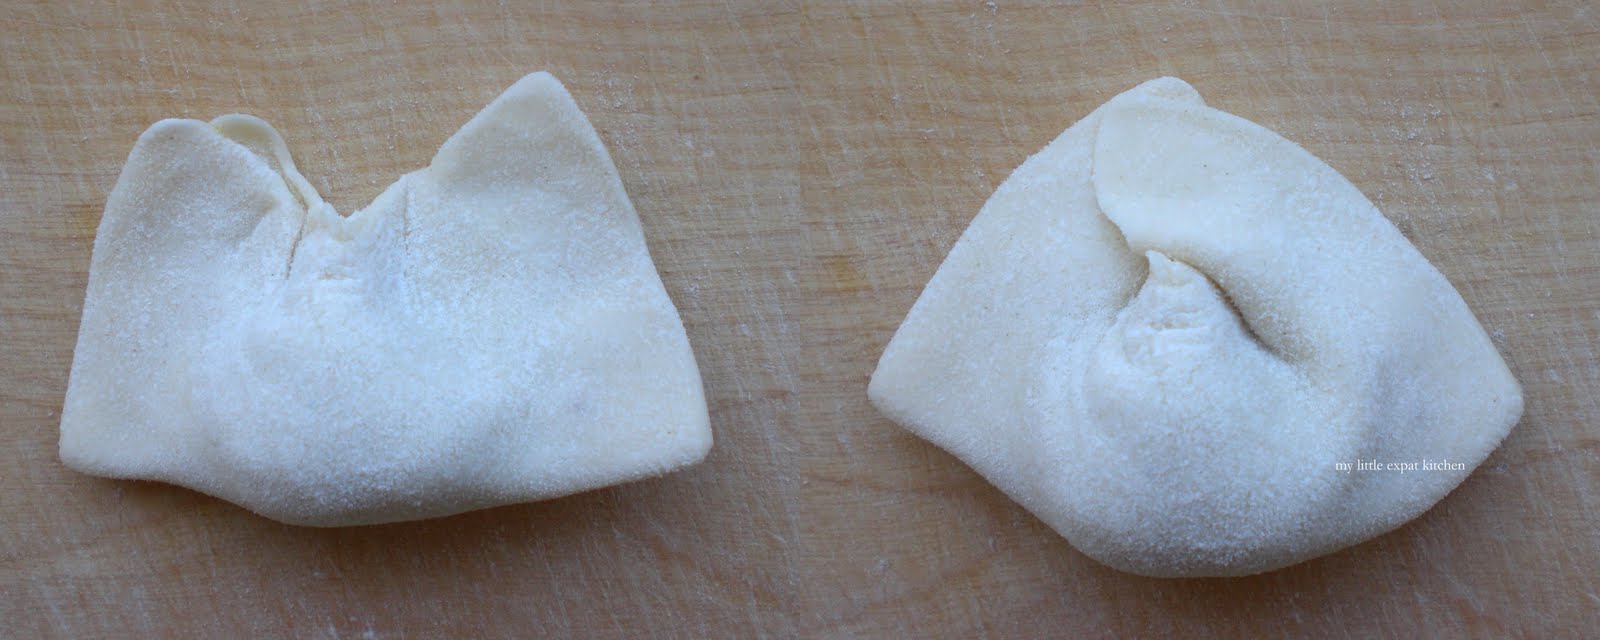
Put a heaped 1/2 tsp of filling at the center of each small square of dough, fold over the dough, creating a rectangle and press all around the edges so that you seal the filling inside the dough. Then take the top two corners of the rectangle and fold them onto one another thus creating a pouch (see the photographs above to get a clear idea of how to make the pouch and what they should look like).

Continue rolling out the rest of the dough pieces, cutting them into 6 x 6 cm squares, filling them and making the small manti.


Preheat your oven to 180 degrees Celsius.
Grease (with 30 g of butter) the bottom and the sides of the baking dish and place each manti (small pouch) inside, arranging the manti one next to the other, and not one on top of the other, until you have filled your baking dish. Also, you must place them in a way that each manti is standing upright, with the filled part of the dough touching the bottom of the baking dish.
When you have filled your baking dish with the manti, brush the tops with 45 g of melted butter and place dish on the lower rack of the oven. Bake the manti for 1 hour until browned.

Note: Once they are ready you must also have ready the hot beef stock.

Take the baking dish out of the oven and turn the heat up to 220 degrees Celsius.
Pour the hot beef stock over the manti, brush the tops again with 30 g of melted butter and place the baking dish back in the oven, on the middle rack. Bake for further 15-20 minutes until the manti have soaked up the beef stock.

Make the yoghurt-garlic sauce
Mash the garlic cloves with a mortar and pestle or using a garlic press. In a medium-sized bowl, add the yoghurt and the mashed garlic and mix with a spoon. Cover the bowl with plastic wrap and place in the refrigerator until ready to use.

Once manti is ready, take the baking dish out of the oven, and place manti on individual plates. Top with 3 - 4 Tbsp of the yoghurt-garlic sauce and sprinkle with cayenne pepper or other hot red pepper as well as with sumac, if using.

Serve immediately.