Minggu, 23 Juni 2013

Where the wild things are

It’s such a revelatory experience for me to savor something new; not so much a product of some novel culinary technique but rather new foods, new raw flavors like a vegetable or a fruit.


I’m constantly amazed when I realize how many vegetables and fruits are out there for me to savor. I feel my taste buds come alive with the prospect and I become intensely aware of all that nature so generously offers to us.


I wasn’t looking to find these when they appeared in front of me at the market, pale green and slender. The wild green asparagus. Looking much thinner and longer than their regular green counterparts.


I couldn’t help but picking up a bunch. Where would I find them again? Their season is nearing its end.


Their taste is close to the green asparagus but fresher and grassier, reminiscent of mellow spring onions or chives with a mild heat and slight bitterness.


I decided the best way to use them would be in an omelette. I’d bought some fresh pea shoots and I had some ricotta in the fridge so I went for it.


Butter, together with a little olive oil to keep it from burning, eggs with a splash of cream to make them even more luscious and the thinner-than-thin spears of the fresh green wild asparagus cut into thirds.


After only a few minutes, lunch was served. S and I dug in and ate it straight from the pan. It was marvelous. With some fresh bread and a glass of white wine, we almost forgot that it was raining outside and that I had a cold


Wild Green Asparagus Omelette with Ricotta and Pea Shoots

I understand that not all of you will be able to find wild asparagus (different kinds can be found in different countries) but regular green asparagus will work as well. Blanched green beans or sautéed spring onions or even young leeks make good alternatives.

I use a wide skillet to make my omelettes because I enjoy them thin—I hate thick omelettes—but, you know, it’s up to you.


Yield: lunch for 2 hungry people

Ingredients
3-4 Tbsp (50 g) unsalted butter
1½ Tbsp olive oil
100 g wild green asparagus spears (40-50 spears), rinsed, dried and cut into thirds
6 large eggs
1-2 Tbsp cream, full-fat
Salt
Freshly ground black pepper
100 g fresh ricotta cheese
A handful of pea shoots

Special equipment: a wide, round-sided skillet or frying pan


Preparation
Add butter and olive oil in a wide, round-sided skillet or frying pan and set over a medium-high heat. Once the butter melts and starts to foam and sizzle, add the asparagus. Sauté them for about 3 minutes, until they soften a bit and add a little salt and pepper.

In the meantime, in a medium-sized bowl add the eggs, cream, a little salt and pepper and whisk until slightly frothy.


Pour the eggs over the asparagus and using a wooden spoon, stir the eggs around a bit and then leave to cook over medium-low heat. It will take 6-7 minutes for the eggs to cook, for a slightly runny top. Cook more or less time depending on how you like your eggs. Be careful not to burn the bottom of the omelette.

One minute before the eggs are cooked, dot the omelette with ricotta. Once ready, either slide and fold the omelette onto a platter or, like us, eat it straight from the pan. Sprinkle with some ground black pepper and add the fresh pea shoots on top.

Enjoy!


Rabu, 19 Juni 2013

Refreshing strawberry drink

When I said on the previous post that one of the reasons I enjoy a more loose jam is to use the syrup that remains, I meant it.


That is perhaps the most amazing thing about strawberry jam; that viscous, sweet syrup with the condensed strawberry flavor that can perk up anything from a boring cup of yoghurt to a simple pound cake.


One of the best uses for this syrup though is in drinks. Sure, you can use it to intensify the aroma and taste of a strawberry daiquiri or margarita, or you can add a splash to a glass of champagne, but for me, the best thing to use it with, is the simplest thing ever. Water. Plain water, still or sparkling.


With a few ice cubes and a squeeze of lemon that cuts through the sweetness, it’s the best drink ever. The concentrated flavor of the strawberry is guaranteed to make you swoon.


Cold Strawberry Drink

Add to a glass ¼ cup of strawberry syrup, preferably from a homemade strawberry jam, and top it off with still or sparkling cold water. Mix, give it a taste and add more syrup if you like. You can also add a squeeze of lemon or lime, and don’t forget plenty of ice cubes and a straw.

Enjoy!


Minggu, 16 Juni 2013

Strawberry jam

I’ve sung the praises of Greek ingredients many times and now is the time for Dutch ingredients and particularly strawberries.


Dutch strawberries are small and sweet, with a reddish-pink color and in one word, awesome. There’s really not much more to say; they’re delicious beyond description.


While in Greece, I made strawberry jam and spoon sweet using local strawberries. I made the exact same thing here in Holland with Dutch strawberries and it was like tasting two completely different things.


The version made with the Dutch berries was tastier with a fuller flavor of the fruit bursting in my mouth with every spoonful and far more aromatic. There’s no better test than that in my book; using the same ingredients and seeing the resulting differences.


I have been making this strawberry jam for years. I’ve mentioned it before, promising that one day I’ll share the recipe. Well, the time has come, finally.


It’s pretty straightforward and quite quick as well; no macerating of the berries is required, which undoubtedly makes things easier. You clean and hull the strawberries, making sure to halve any that are big; this isn’t of course the case with Dutch strawberries that are invariably small and cute.


The secret to this jam is twofold. First, it’s the lemon seeds that are put inside a muslin cloth and into the pan along with the berries as they simmer, thus omitting the need for artificial pectin and second, the vanilla seeds that bring an incomparable flavor and aroma to the jam.


This jam can be as thick or thin as you like it. I usually prefer it on the thinner side as this gives me the chance to enjoy the small berries in all their juiciness and sweetness and not mashed into oblivion, but also because I can use the syrup that usually remains, to make strawberry drinks of any kind.


Of course, for those of you looking for a more traditional jam consistency, you can simmer the berries for longer and mash them as they cook inside the pan.


I have made it twice already and I’m planning on making it a couple more times before the strawberry season ends. On top of cakes and crepes, yoghurt or ice cream, on top of buttered bread, straight from the jar with a big old spoon, I simply can’t get enough of it.


Strawberry Jam with Vanilla

Needless to say, the more aromatic and flavorful the berries you use, the more tasty the jam will be. Choose strawberries that are ripe but not overripe.

I use a thermometer to determine the setting of the jam but it is not necessary. The simple sauce-in-the-freezer technique described in the recipe, works just as well.


Yield: about 1.5 liters / I usually end up with 4 medium jars of jam

Ingredients
1.5 kg fresh strawberries, hulled and halved lengthwise if too big
1 Tbsp water
2 tsp lemon seeds
1 vanilla bean, cut in half lengthwise and seeds scraped
1 kg caster sugar
120 ml lemon juice

Special equipment: muslin or cheesecloth, twine, sugar/candy thermometer (optional), potato masher (optional), glass jars with lids


Preparation
In a large, heavy-bottomed pan, add the strawberries and the water and cook over medium heat for about 15 minutes, stirring occasionally with a wooden spoon, until the strawberries soften.

Place the lemon seeds inside a piece of muslin or cheesecloth and tie it with twine to the handle of the pan. You need to make sure that the lemon seeds are immersed in the fruits. Add the cut vanilla bean as well as the scraped seeds, followed by the sugar and the lemon juice, stir with a wooden spoon until the sugar is dissolved and turn heat up to high. Bring to the boil and place the sugar thermometer in the pan, if you’re using. Turn heat down to medium and cook for 20-25 minutes, depending on how thick you want your jam, or until the thermometer reads 105 degrees Celsius / 220 Fahrenheit (known as the setting point), and making sure to stir it from time to time. If you want to mash the fruit, do it gently with a potato masher while the jam is simmering.

Note: As the jam simmers, remove the scum that forms on top with a metal spoon in order to have a clear jam.


If you don’t have a thermometer, you can check if the jam is ready by doing the following: Put a small plate in the freezer for 5 minutes. Take it out and spoon a little of the jam on it. Leave to cool for 1 minute and then push the jam with your finger; the top should wrinkle. If not, boil for a couple of minutes longer and test it again. Keep in mind though that once the jam cools, it will thicken.

When the jam is ready and the consistency is to your liking, remove the vanilla bean and the muslin cloth with the lemon seeds from the pan. Pour the jam into sterilized jars and turn the jars upside down. (Read here on how to sterilize glass jars). Once the jam has cooled completely, put the jars in the refrigerator.

The jam will keep for several weeks in the fridge.


Sabtu, 08 Juni 2013

Asparagus


I saw them at the market the other day and I couldn’t resist but coming closer. I was drawn to them.

They looked slim, tall and incredibly green with a touch of purple and I decided to take some home with me.


As soon as I got back, I put them in the fridge; I needed them to stay crisp and cool.


The green long spears were standing proud in all their freshness and I dreamed of their nutty flavors and earthy accents.

They screamed for something rich and buttery; something zesty too.


I thought that if I paired them with parmesan and lemon they’d make the best salad; drizzled with a little olive oil they wouldn’t need anything more.

But then I remembered the puff pastry I had in my freezer that was begging to be used.


So I trimmed them, just a tad, enough to remove their slightly tougher outer layer near the bottom and I blanched them, just so that they became tender. I laid them on the smooth surface of the puff. They felt safe there. I covered them with cream and a little cheese. They liked it.


I put them in the oven and after a while the heat started to caramelize and char them. The cheese melted on top of them, turning them into the most delicious treat I could ask for.

The puffed pastry turned golden brown all around and while the tarts were still hot and crisp, I served them with a good sprinkling of finely chopped fresh parsley and grated lemon zest.


They were, needless to say, eaten voraciously.


Green Asparagus Tarts with Puff Pastry
Slightly adapted from The Kitchen Diaries II

It’s best to use long and lean spears for this rather than chubby ones. They’ll fit perfectly inside the long, slim strips of puff pastry and they’ll also be less stringy.

Once again, I used homemade French puff pastry but you can certainly use store-bought. Just make sure to thaw it properly. Remove it from the freezer and place it in the fridge 24 hours before using it.


Yield: 4 long, thin tarts

Ingredients
350 g homemade puff pastry or 1 sheet of ready-made puff pastry
12 thin, long, fresh green asparagus spears, trimmed
100 ml cream, full-fat (35%)
50 g grated Parmesan
Freshly ground black pepper
1 small egg, lightly beaten, for glazing
Handful of fresh parsley leaves, chopped
Zest of 1 small lemon, finely grated

Special equipment: rasp grater, colander, pastry brush, baking sheet, baking paper


Preparation
You can read in this post how to clean, peel and trim the asparagus.

Fill a large pot with water and bring it to the boil. Add the asparagus and boil them with the lid off for 5-7 minutes depending on their thickness or until they are tender. Be careful not to overcook them because they’ll start to fall apart. Remember, they will cook again in the oven. You can tell if they’re done by inserting the point of a knife into the thickest part of the spear. If it slides in with ease, they’re ready.
Drain them in a colander.

Line your baking sheet with baking paper.

If you’re using homemade puff pastry, dust a clean work surface and the top of the dough with a little flour and using a rolling pin, roll it out into an approximately 40 x 26 cm elongated rectangle with a thickness of 0.2-0.3 cm. The thickness of the puff pastry is important because it determines the baking time.
Cut the puff pastry into 4 long rectangles (about 10 x 26 cm each) and transfer them on the prepared baking sheet. Lightly score with a knife a frame, about 1.5 cm from the edge of the dough. Cover with plastic wrap and place the baking sheet in the refrigerator.

Preheat your oven to 200 degrees Celsius / 390 Fahrenheit.


In a small saucepan, add the cream, parmesan and a little black pepper and warm over medium heat. Do not bring to the boil, you want the mixture to be warm not hot.

Take the puff pastry out of the fridge and pour with a spoon half of the cream mixture inside the frame of each long rectangle. Lay 3 asparagus spears on top of each rectangle and spoon over the rest of the cream mixture. Take care not to overflow the tarts.

Brush the frame of the dough with the beaten egg and place the baking sheet on the middle rack of the preheated oven. Bake the tarts for 16-17 minutes until the pastry has puffed and has taken on a golden color and the cheese has melted and turned golden in patches.

Remove the tarts from the oven and sprinkle with some parsley and grated lemon zest.
Serve immediately.


Senin, 03 Juni 2013

The Peinirli

Soutzouki and pastourmas have always been staples in my fridge in Greece. Here in Holland they’re impossible to find and even if I do manage to scare up something that resembles any one of them, their taste and quality is a far cry from what I’m used to.


One of the things I brought back with me from Greece, besides the good supply of chocolates, are these two delicacies. Soutzouki, as I’ve previously mentioned, is a spicy fresh sausage made nine out of ten times with beef meat, and pastourmas is seasoned, spicy air-cured beef.


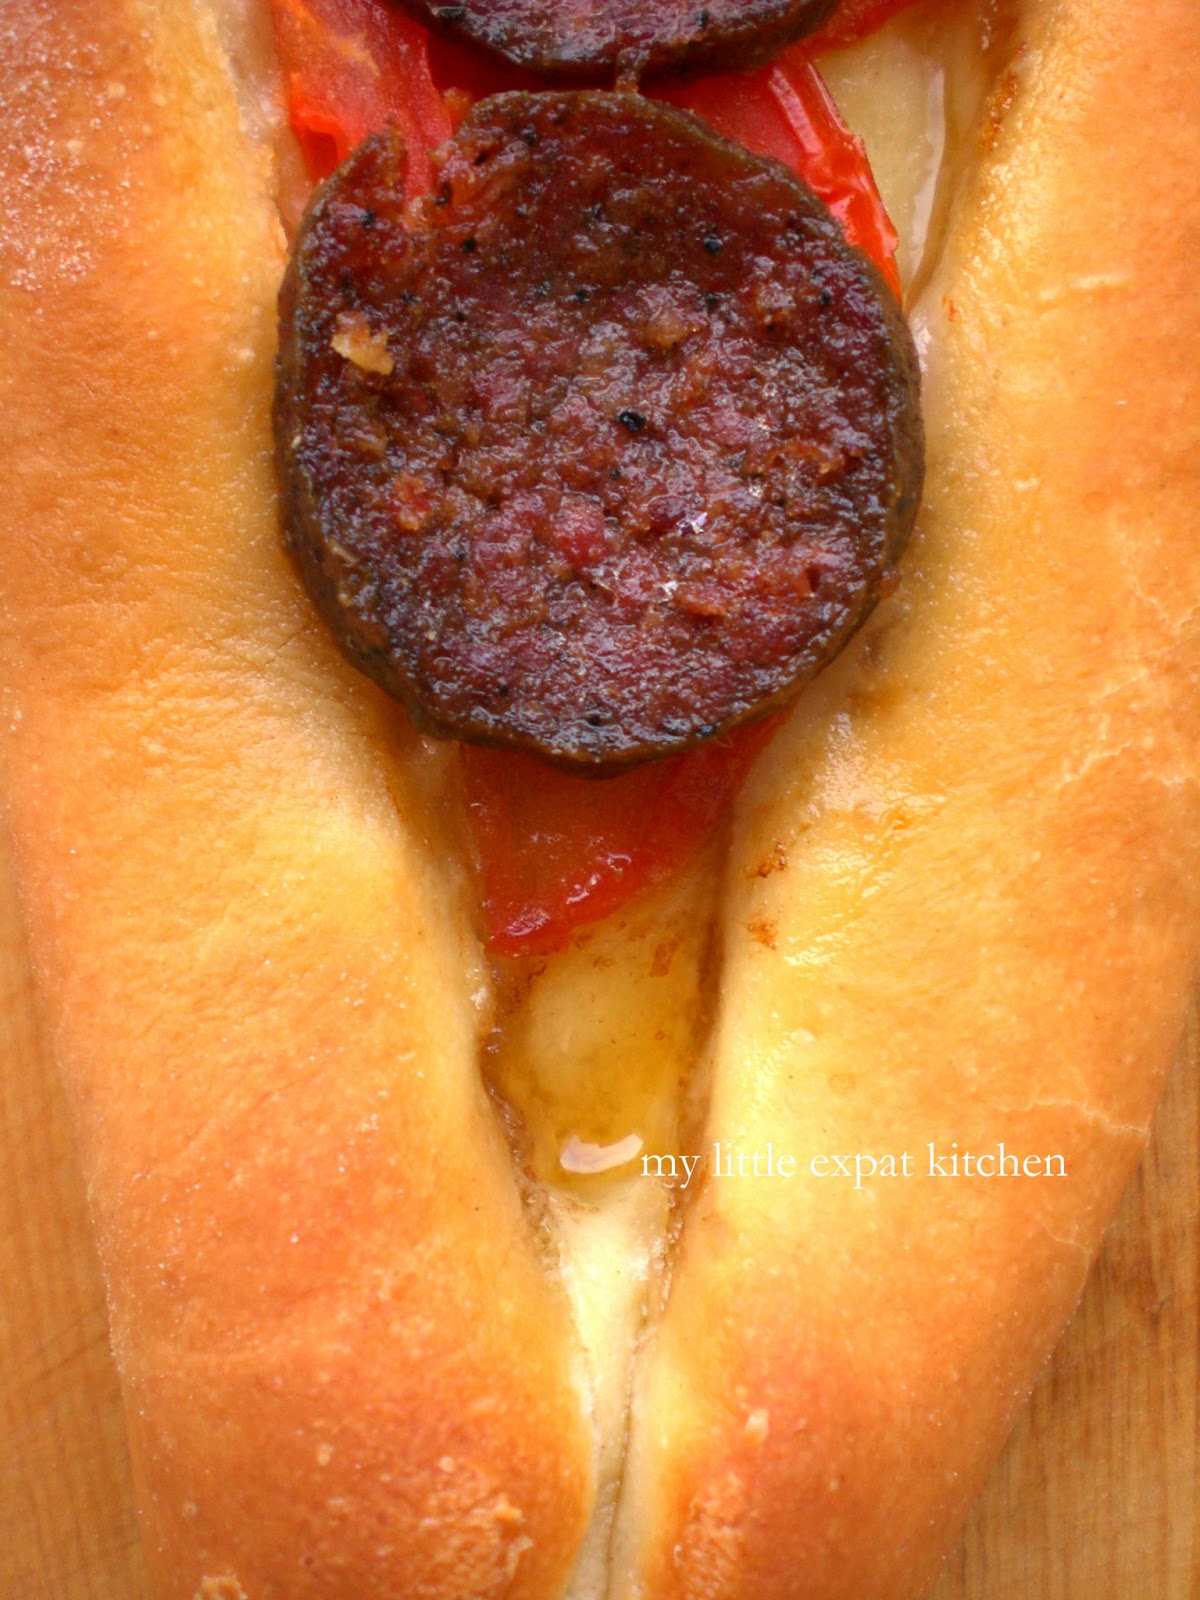
The best way to eat these two is to simply slice them and serve them with a chunk of fresh bread and a shot glass of ouzo; they make the perfect meze on a warm summer evening. On the other hand, a wonderful way to savor them is adding them to a peinirli.


The Greek word Peinirli (Πεϊνιρλί) derives from the Turkish word Peynirli which translates to “with cheese” (peynir means cheese in Turkish). Peinirli is a boat- or rather canoe-shaped yeasted bread, similar to the Turkish pide but larger, with a dough that’s soft inside and beautifully crusty but not hard on the outside.


Peinirli is beloved by all Greeks, especially those whose families come from Constantinople and Smyrni as mine, but also Pontus. When Greeks from Pontus (the Greek name for the Turkish Black Sea south coast) arrived in Greece in the 1920’s after the population exchange between Greece and Turkey, some of them settled in Drosia, an Athenian suburb, and opened restaurants that served their specialty, the peinirli. Till today, Athenians make the almost one-hour trip by car to Drosia to have the best peinirli in Greece.


One more thing that makes peinirli unique and delicious is its fillings, with the traditional one being the Greek kaseri cheese that sizzles in the middle of the risen baked dough, and the butter that needs to be added as soon as the little doughy boat comes out of the oven so it can melt gloriously on top of said cheese.


Peinirli can have various other fillings like minced meat, eggs, tomato, ham, sausages and many more. In my family, what constitutes a traditional peinirli is one filled with soutzouki or pastourma, cheese and tomato.


The pungent and spicy flavor of both pastourma and soutzouki paired with the rich cheese and fresh tomato make for a tasty treat. Both these delicacies are quite heavy when cooked though, so tread cautiously. Try not to eat too much.


No matter what kind of filling you end up using in your peinirli, I do hope you enjoy this classic Greek yeasted savory delight.


Peinirli

Peinirli is quite substantial fare and can be enjoyed as a main meal, much like pizza, or as a snack cut in smaller pieces.

If you can’t find soutzouki, you can use any other kind of sausage you want. Same with pastourmas, just substitute with another type of spicy air-cured beef.

If you have a pizza stone, then by all means use it to bake the peinirli. The result will be excellent.

Semolina flour is finely milled semolina (it’s not fine semolina but semolina that is so finely milled that has the texture of flour). In Greece, this flour is widely used for bread and all kinds of yeasted savory doughs. If you can’t find it, use strong bread flour.


Yield: 8 peinirli

Ingredients

for the dough
300 g all purpose flour, plus extra for sprinkling your work surface
200 g semolina flour (from durum wheat)
9 g instant dried yeast
1 tsp sea salt
½ tsp sugar
200 ml lukewarm water
150 ml lukewarm fresh whole milk
50 ml good quality olive oil, plus extra for greasing dough and bowl

for the cheese filling
Greek kasseri cheese or Swiss Emmentaler, grated
Unsalted butter, preferably sheep’s butter

for the pastourma or soutzouki filling
Pastourma, sliced
Soutzouki, sliced
Tomato, sliced
Greek kasseri cheese or Swiss Emmentaler, grated

Special equipment: box grater, stand mixer with dough hook attachment (optional), large baking sheet, baking paper, pizza stone (optional)


Preparation
In the bowl of your stand mixer or in a large bowl, add the flours, the yeast, sugar, salt (making sure it doesn’t come in contact with the yeast), the lukewarm water and milk, and the olive oil.

If you’re kneading in a stand mixer, attach the dough hook and knead for about 7 minutes, on the lowest speed, until the dough no longer sticks to the sides of the bowl, remains slightly moist and it is smooth and elastic. Empty it onto a lightly floured surface (use all–purpose flour for this) and knead it a little to see how it feels. It should feel a little sticky to the touch.

If you're kneading by hand, once you have mixed the ingredients together into a rough dough, take it out of the bowl and onto a clean surface and knead well. It'll take about 10 minutes. What you're aiming for is a soft and pliable dough that's sticking slightly to your hands and that remains moist but not overly so that you can’t knead it.

Note: Not all flours are the same, so if your dough is very wet, don't be afraid to add more flour (all-purpose flour). Add a little at a time though, testing the consistency of the dough. You don't want to end up with a stodgy, stiff dough. I find that with this dough, I always seem to add a little more flour so that it doesn’t stick too much (about 35 g more).

Shape the dough into a ball, lightly grease the bowl of your stand mixer (or a large bowl) as well as the dough ball with olive oil and place the dough inside the bowl. Cover the bowl with plastic wrap and place it in a warm place, allowing the dough to proof and double in size. It will take about 1 hour to proof, depending on how warm the room you leave it in is.
During the winter, I always leave my dough next to a working radiator. Not on top of it but on a chair and right in front of it.


Once the dough has proofed, take it out of the bowl and knead it for a couple of seconds just to deflate it a bit. It should feel smooth, pliable and soft. Divide the dough into 8 equal pieces (around 115 g each) and shape into balls. Oil the balls (so they don’t stick to one another) and place them in the bowl after you oil it again. Cover the bowl with plastic wrap and place it in a warm place, allowing the balls of dough to proof until almost doubled in sized. It will take 30-40 minutes.

Preheat your oven to 225 degrees Celsius / 435 Fahrenheit.
If you have a pizza stone, place it on the lower rack of the oven to preheat as well. If not, prepare your baking sheet by lining it with baking paper.

Once the dough balls have proofed, take each one and place it on a floured surface and flatten it into an oblong shape (about 26x13 cm). Take the bottom edge and fold it (see photo below). Then take the upper edge and fold it (see photo). Seal the two pointy ends by pressing them together (where the two folded parts overlap). If it’s difficult because of the flour, add a little water with your fingertips between the two pieces of dough and press them together to seal. You will have a boat-shaped dough with elevated sides that’ll keep your filling inside.
Continue with the rest of the dough balls. My oven is small so I can fit only three at a time. While the first batch is baking I shape the rest.


Place the shaped peinirli onto the prepared baking sheet (or onto the pizza stone that you have sprinkled with a little flour), prick the inside of the “boat” (where you’ll later add your filling) with a fork so it doesn’t puff up and place on the lower rack of your preheated oven. Bake for 10 minutes, until they begin to color. Take them out and lower the heat to 185 degrees Celsius / 365 Fahrenheit.

Fill the peinirli with the ingredients of your choice. If you’re using cheese, add a generous amount in the middle. If you’re using the soutzouki or pastourma, add a couple of slices of tomato at the bottom, followed by a couple of slices of soutzouki or pastourma and then some grated cheese on top. Be careful not to overflow the boat, no pun intended.

Return the peinirli in the oven and bake for a further 10 minutes, until the cheese melts but doesn’t brown. It shouldn’t form a crust.

Take them out of the oven and if you made the cheese peinirli, add a couple of knobs of butter on top to melt.

Serve immediately.